Showing posts with label Howl-o-ween Tricks and Treats Craftathon 2012. Show all posts

Wednesday, October 31, 2012

HTTC - Costumed Canines, Mummy Gidget


Sometimes, for a minute, I feel a little bad for dressing up my dogs in silly costumes, but its just for a minute.  Gidget was none too pleased to be wrapped up in this get-up but how cute is she.  We hope you all have a safe and spooky Howl-oween with your family, friends and furry companions.  

Haunt on!
Anita

Monday, October 29, 2012

HTTC - Costumed Canine, Sadie Throwback

She had me under her spell from day one.  I found this witch costume in my halloween dog stash and realized it was the first one I ever bought, over 12 years ago.  We had to try and yes it still fits.  Very different look for her from when she had her first halloween all those years ago.  I even found a picture of Sadie from that first year.  Hope you guys are getting ready for the big day and staying safe from Sandy's wrath.


Haunt on!
Anita

Monday, October 22, 2012

HTTC - Tombstone Fix-it


Do you have some of those super cheap dollar store type tombstones laying around in your Halloween stash?  Did you loose the stupid little wire pieces that are supposed to keep them in the ground?  Then you are just like me.  I had wire stakes for about three of the 10 I have and they don't even keep them in the ground when there's the slightest wind to boot.  Time to think up a solution.


Supplies
Glue
Furniture tacks (4 for each tombstone)
Conduit brackets (2 for each tombstone)
Garden stakes (1 for each tombstone)

1.  When picking out your supplies make sure the garden stakes you get will fit in your conduit brackets.  The brackets can be found in any hardware store in the electrical section.  Also make sure the glue you use isn't too harsh or it can melt the styrofoam of the tombstones.

2.  For each tombstone glue two brackets on the back in the middle (vertically).  One close to the bottom and one a little higher than the middle.  Make sure to follow your glue's directions.  Mine took over two hours to dry.

3.  Now take your furniture tacks and push one into each of the holes on either side of the bracket, on both brackets.


4.  Now go and pound your garden stake into the ground where you want your tombstone to be.  Slide your garden stake through the openings on the conduit brackets.

TADA!  You're done.  Now you can reuse these guys for years to come.


Haunt on!
Anita

Sunday, October 21, 2012

HTTC - Dogstumes Sage and Sprout

Sage is all decked out and ready for hunting season.  The cookies should be shaking in their bowls.
 
Sprout is not one to be too girly so she wanted to go as a ballerina pirate.
 
 
Happy Haunting...........BOO!
 
Kelly, the origami ninja


Wednesday, October 17, 2012

HTTC - 3D Skeleton Painting


The spirits of the other side are ready to come out and play. Are you prepared the mischief they will cause? 
Here is a little peak in one of the ways they will come. I have created a skeleton coming out of a painting ready to drag you in. 
Would you like to make one? 

Materials:
1. Cardboard (Free)
2. Skeleton (Michaels 14.99)
3. Modge Podge (own or 4.99 at Michaels)
4. Black paint & red paint  (.59 cent)
5. Burlap ($2.00 for half a yard)
6. foam brush (.10 cent)
7. Frame (Michaels on clearance $9.99)
8. Clay ($8.99 Michaels)
9.Tape (own)
10. 24 gauge wire (own) 
11. Scissors (own)
12. Saw (own $4.99)


The first thing you will need to do is to cut the back of the skull of your skeleton because you want him to lay flat on the cardboard. Measure the cardboard to fit the inside of your frame. My frame is 8x10. 


Position your skeleton, my skeleton name is Joe where you want him to be.  


I felt bad cutting Joe up but he feel much better once all the extra weight is off. 
I cut through the spice of Joe to make sure he could fit in the frame. 


Mix modge podge with black paint with a foam brush.


Now the messy part starts, use the mixture and paint the burlap with it.


I told you it was going to get messy! Its going to look a little muddy but it will be worth it once it dries. You will need to cover the entire cardboard. Don't lay the burlap flat on the cardboard because you will need some depth with it to make it look realistic.


Also use the modge podge to clue the down the skeleton. Let the burlap dry for at least 24 hours. 


I wanted to have Joe reaching out for someone, so I took masking tape to hold the joints in place. I then used the burlap with modge podge to cover masking tape.


I did not stop there I also cut all the finger off and used the 24 gauge jewelry wire to reattach all the  fingers. Can you believe that Joe had to right hands before I did the surgery? haha. Now his finger can bend and point at you.


The last thing I did was make a heart out of clay to be place in rib cage.


Imagine that you are done!!!


I think my puppy liked it.


Happy Halloween from Pandora's Craft Box.

Head on over to Pandora's Craft Box for more fun ideas for all year round.

Saturday, October 13, 2012

HTTC - Costumed Canines, Mr. Biscuit


Don't let the clothing fool you.  Mr. Biscuit is no chicken.  He's a straight up manly rooster.

Haunt on!
Anita

Wednesday, October 10, 2012

HTTC - Fall Door Ringer

I needed to replace my door ringer and make a gift for a friend, my Aunt who had surgery and one of our girlies.  They are much prettier in person!   This door ringer can be used from now through Thanksgiving.                                                             
They make great gifts and you can use make them for all seasons. 
Step One
You use the cord that upholsters use - get the cord that is as big around as your thumb.
Cut it as long as you want to make your ringer.
 Step Two
Wrap your cord with ribbon and hot glue each end.  It takes about a yard to wrap the cord.
 I use bread twists or the extra that come with garbage bags - but whatever you use wire the cord together and then add a big bell with wire.  Hold it up and make sure that it moves so it will ring before you totally secure it.  Then I add a dab of hot glue. 

 Tie a bow using one yard of ribbon, secure with wire and then wire it to the ringer.
 Now the fun stuff begins - decorate it any way you want.  You can use loose leaves or flowers,  a pick, anything you have.  I used all loose leaves on mine and stuck in a few do dad's. 

Here are a few that I made:


Have fun with these!  Just let your creativity flow!

Thanks so much to Paula at Buckets of Halloween for this great post.  
Check out her blog for tons more fun ideas.


Tuesday, October 9, 2012

HTTC - Ghostly Garland Tutorial


This a long tutorial but its easier than it looks.  I made sure to be extra detailed with the instructions but its really just a two part process.  Part 1 - Make Ghosts    Part 2 - Make Garland   Easy peasy!

Supplies
Ghosts -
     Cheesecloth
     Liquid starch
     Small dixie cups (white or clear plastic)
     Small balloons (don't use the red ones)
     Black felt for faces

Garland -
     Silver Deco mesh ribbon (1 roll), I got this at Hobby Lobby in their fake flowers section
     Black Wired ribbon (1 roll)
     Jewelry or floral wire, preferably same color as your mesh
     Black pipe cleaners
     Black ribbon (thin)
     Tapestry or sharp yarn needle

Ghosts
1.  Start by making your forms.  Blow up a balloon just big enough so it covers the top of your cup.  Poke a hole in the top of your cup and pull the end of the balloon through.

DONT USE RED BALLOONS.  
I found out the hard way that the red coloring comes off on your cheesecloth when they dry.
You can also just make these from aluminum foil but I wanted the heads to be really round.  Make sure to get your forms inspected by an available pooch for quality control.

2.  Cut 3 inch strips of cheesecloth and soak them in full strength liquid starch.  Squeege off the excess and drape over your form.
Repeat until your form is covered.  Make a couple extra just in case.

3.  Let dry 24 hours and then remove forms.  Be careful not to tear your ghosts in the process.

4.  OPTIONAL -  My ghosts had a little residual color that came off the cups I used so I took a regular ink pad and a scrap of fabric and rubbed some ink on the inside and lower edges to hid it.  Plus this makes them extra dirty and scary looking.  Wear gloves if you're going to do this step.

5.  Now we need to make their faces.  Cut out eyes and mouths for each of your ghosts and hot glue them on.  Tada!  Ghosts done.

Garland
1. First decide how long your garland needs to be.  Then cut a pice of your jewelry/floral wire about a foot longer, don't worry we will trim it at the end.  Starting at the center of your jewelry/floral wire take one of the pipe cleaners and wrap it with the heavier gauge wire to secure.  Repeat about every 7 inches to either end until your wire looks like this.  Make sure your pipe cleaners are secure and won't slide down the wire.

2.  Starting at one end with the grey deco mesh bunch a piece and tie it with the pipe cleaner at the end.  Make sure to leave a tail at the end for a nice finish.  Now repeat bunching and tying at each pipe cleaner but bubble up the mesh to add volume.

3.  Repeat step 2 with same deco mesh.

4.  Take your wired black ribbon and repeat the tying and bunching two more times, making sure to leave a nice tail on each end.

5.  We are going to add a little loop of the thin black ribbon onto the back of each of our ghosts so we can attach them to the garland.  Take a piece of thin ribbon and run it through the back of your ghost with the yarn needle.  Tie it in place leaving a loop.  I used a pen to tie around.

Notice that I put the loop in the back of the ghost not on top.  This will keep him centered on your garland rather than hanging down from it.

6.  Now take each of your ghosts and run one of the pipe cleaner ends through your loop to attach.  Twist the pipe cleaner together to secure everything in place and trim the excess wire on either end.
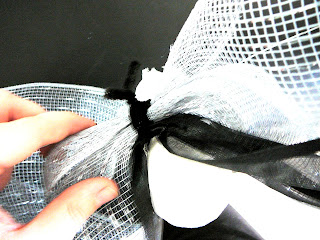
sorry this pic is fuzzy.
7.  Hang and enjoy.  Doesn't it look great?


Haunt on!
Anita