

Supplies:
Styrofoam cone
Felt - red, white, black (I had some sparkly red felt and love how it came out.)
Scrap of off white fabric
1 White Pom Pom
Puffy fabric paint - red and white(I used the glitter kind.)
Black craft paint and paintbrush
Glue gun with sticks
A couple sewing pins
Scissors
1. First you're going to cover the bottom of the cone with some of your red felt like below. Ignore the green paint. Remember this was supposed to be a tree. You'll be covering the entire surface of the cone so the underside doesn't matter.

2. Now you're going to have to decide where you want your Santa's face to be. Take out your off white fabric scrap and glue it to your cone where you want the face to be. Just make sure your fabric piece is bigger than the area needed for the face. We will cover the edges with felt.
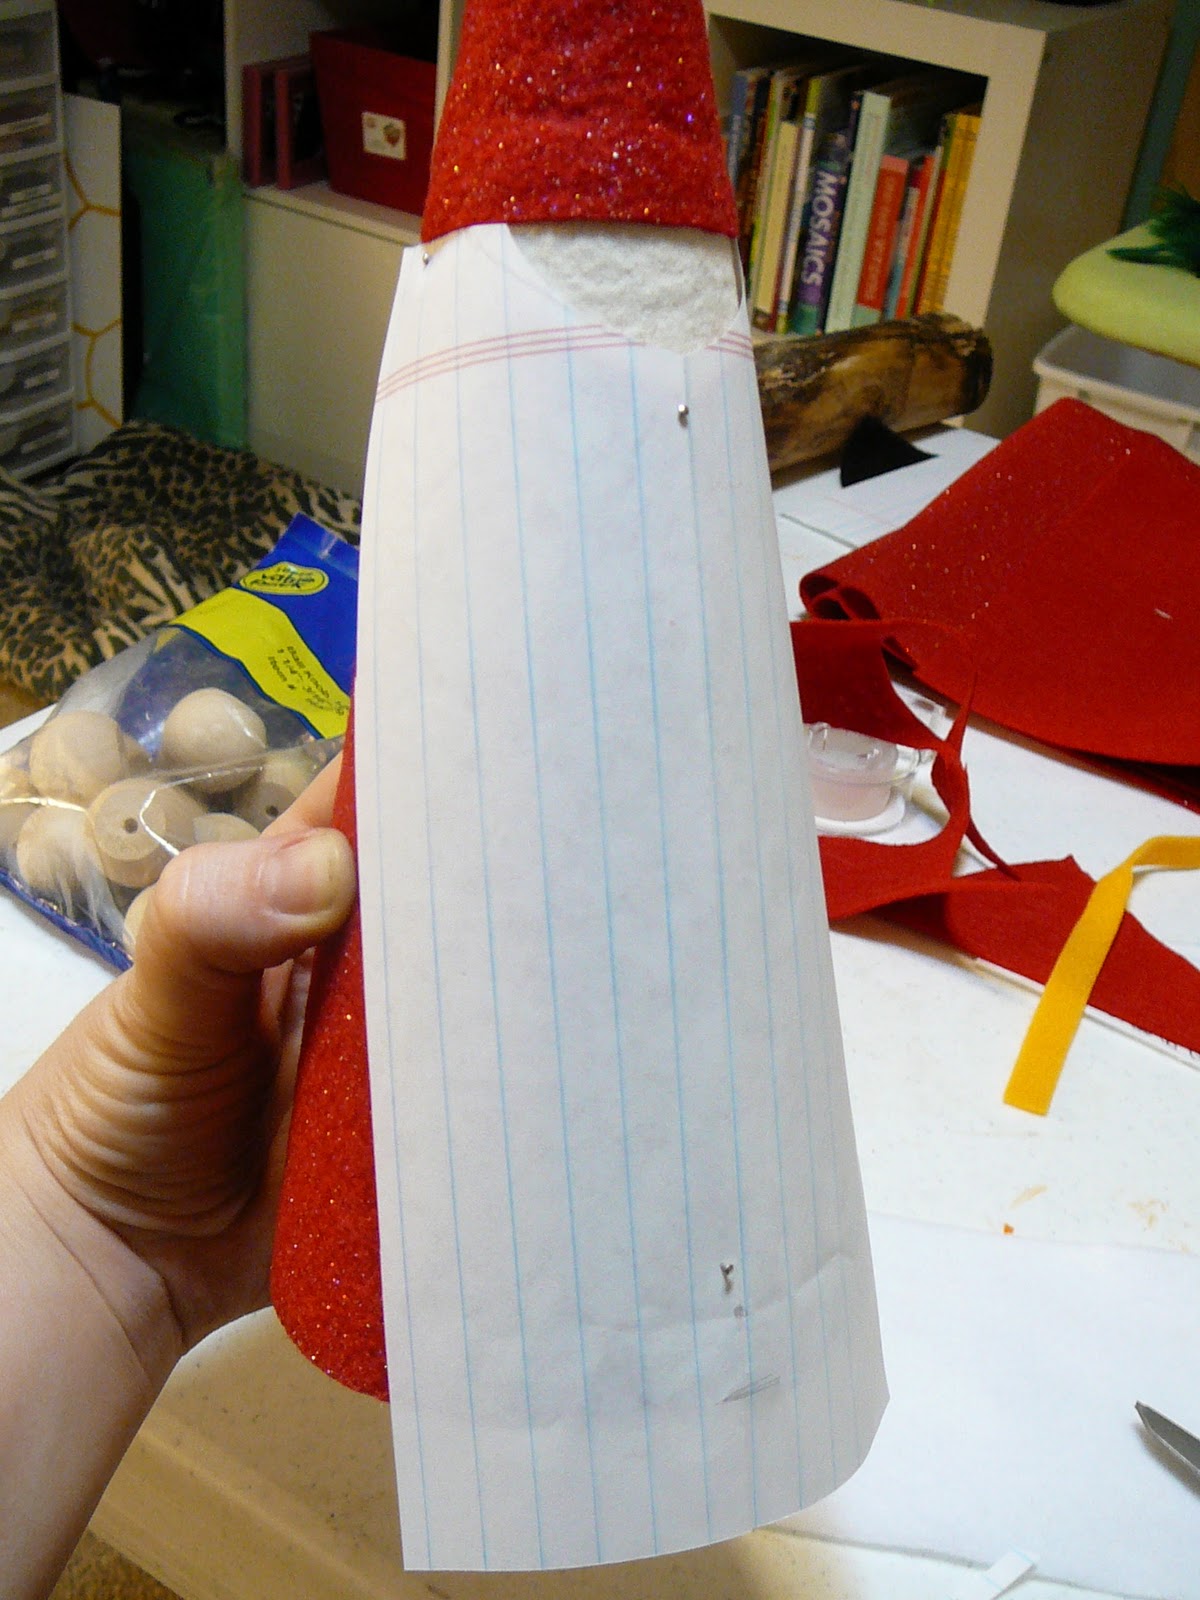
3. Next step is to make the first of three paper templates you're going to use. This one is for Santa's coat. Wrap a piece of paper around the base of the cone and pin it in place. Now trace the outline of your Santa's coat how you want it to look. Transfer that to some of your red felt, leaving some extra room around the edges and cut it out. It should look something like this.

4. Pin Santa's coat into place and trim it to fit. Don't leave any overlap on the seam. We will cover it with his beard so make sure you line the seam up to run down the front of your Santa centered on the fabric you've placed for the face.

When you're happy with the fit glue the coat down to the cone.
5. Repeat your template process but this time for a hat. Remember to leave space between your hat and coat for Santa's face. This time you do want an overlap on the seam when gluing together your hat.

Once you've glued on your hat bend over the tip and glue it in place. Now glue your white pompom onto the top.

6. Now make your last template for Santa's beard. Pin your paper in place and trace the outline for your beard making sure to reach from the bottom of your hat to the base of the cone so it will cover the coat's seam.

Transfer to white felt but don't glue it down just yet. See the space left in the back of the head? Just cut a piece of white felt for Santa's hair to cover the gap.

Now you can go ahead and glue down the beard using it to cover Santa's coat seam and overlap the edge of the hair piece. I pinned mine in place to help with keeping it centered while I was gluing.


7. Take your black felt and cut a strip to make a belt. Glue it down from the back and trim it to fit to the sides of your Santa's beard.

8. Now we need to add the trim to Santa's outfit. Cut two strips of white felt, one for the hat trim and one for the base of the coat. I made mine about 1/2 inch in width. Glue in place with the hat trim seam in the rear and the coat trim seam at the front on either side of the tip of the beard.


Here's what your Santa should look like so far.

Our last bit of felt work is to add Santa's mustache. I made mine pointy to match the angles of the cone.


9. Ok, enough with the felt already. Break out that paint you've got waiting. Using the back of your paintbrush apply two black dots for Santa's eyes.


Transfer that pattern using your white/glitter puffy paint onto your Santa's beard.

Now just let it all dry and you're done. How cute is he?!

All that's left to do is to find him a nice home.

Hope you love yours as much as I do mine. Stay tuned for more to come in this Christmas display. I'm thinking Santa needs some company.
Wassail on!
Anita
LOVE it!!! What a great idea! :)
ReplyDeleteSo nice to 'meet' you today! I blog at "Only A Breath" and would love for you to stop by and visit :)
Hugs!
Melanie
Adorabel! I love the detail on the beard.
ReplyDelete~Michaela @ coveredinmodpodge.blogspot.com
Wonderful tutorial! I'm visiting from Seasonal Sundays, and am your thumbnail neighbor ;o)
ReplyDeleteSo Cute!!! Pat
ReplyDeleteOMG how cute and you make it seem so simple. I'm visiting from Amaze Me Monday. Thanks for sharing the tutorial.
ReplyDeleteVery cute! He looks great with your trees :) Clicking back to find the tutorial for those too!
ReplyDeleteSuper Cute idea, I can't wait to try it, even though my dog will probably devour it and if he doesn't my baby will....life...
ReplyDeletevisiting from
http://www.virtuouswomanexposed.com
This is soo stinkin adorable! I may have to recreate this on a cardboard cone to use as a topper for my Christmas tree! Thanks so much for sharing with the Pink Hippo Party.. can't wait to see what you share next!
ReplyDeleteGreat tutorial! Simply adorable take on Santa!
ReplyDeletelove him and you are right he will be the perfect thing to set off your grouping of feather trees. Thanks for the link up to BeColorful's Motivated Monday.
ReplyDeletePam
Holy moly - that is so cute! What an adorable Santa...I want one of these!
ReplyDeleteHe's so cute.
ReplyDeleteI'd love it if you could link this project to my Simply Christmas Inspiration party at ~ http://shabbyartboutique.blogspot.com/2011/12/inspiration-friday_09.html
That is a seriously adorable Santa! Would you please share this with our readers for our Fun Stuff Fridays linky party? http://www.toysinthedryer.com/2011/12/fun-stuff-fridays-3.html
ReplyDeleteVery, very cute! I would love it if you would share with my readers! I am running a 25 Days of Handmade Christmas series. For info: http://embracingmessy.blogspot.com/2011/12/25-days-of-homemade-christmas-day-1.html or just email at embracingmessy@gmail.com if you're interested!
ReplyDeleteLOVE your felt cone Santa! I'm featuring you on my Facebook page today -- so great to have you back at the party!!
ReplyDeleteThank you so much for sharing your creativity and talent on "A Little Birdie Told Me..." Tuesday at Rook No. 17!
Friends who link-up to tomorrow’s party will have a chance to win a $25 gift certificate to Hodgson Mill, so please feel free to stop by and join in the fun & inspiration!
Warmest wishes,
Jenn
He's SO cute, I love him! I'm featuring it today on Topsy Turvy Tuesdays
ReplyDeleteHi there, how adorable is your santa. Thanks so much for sharing how to make one for myself. I have recently found your blog and am now following you, and will visit often. Please stop by my blog and perhaps you would like to follow me also. Have a wonderful day. Hugs, Chris
ReplyDeletehttp://chelencarter-retiredandlovingit.blogspot.com/