Showing posts with label Howl-o-ween Tricks and Treats Craftathon 2014. Show all posts

Friday, October 31, 2014

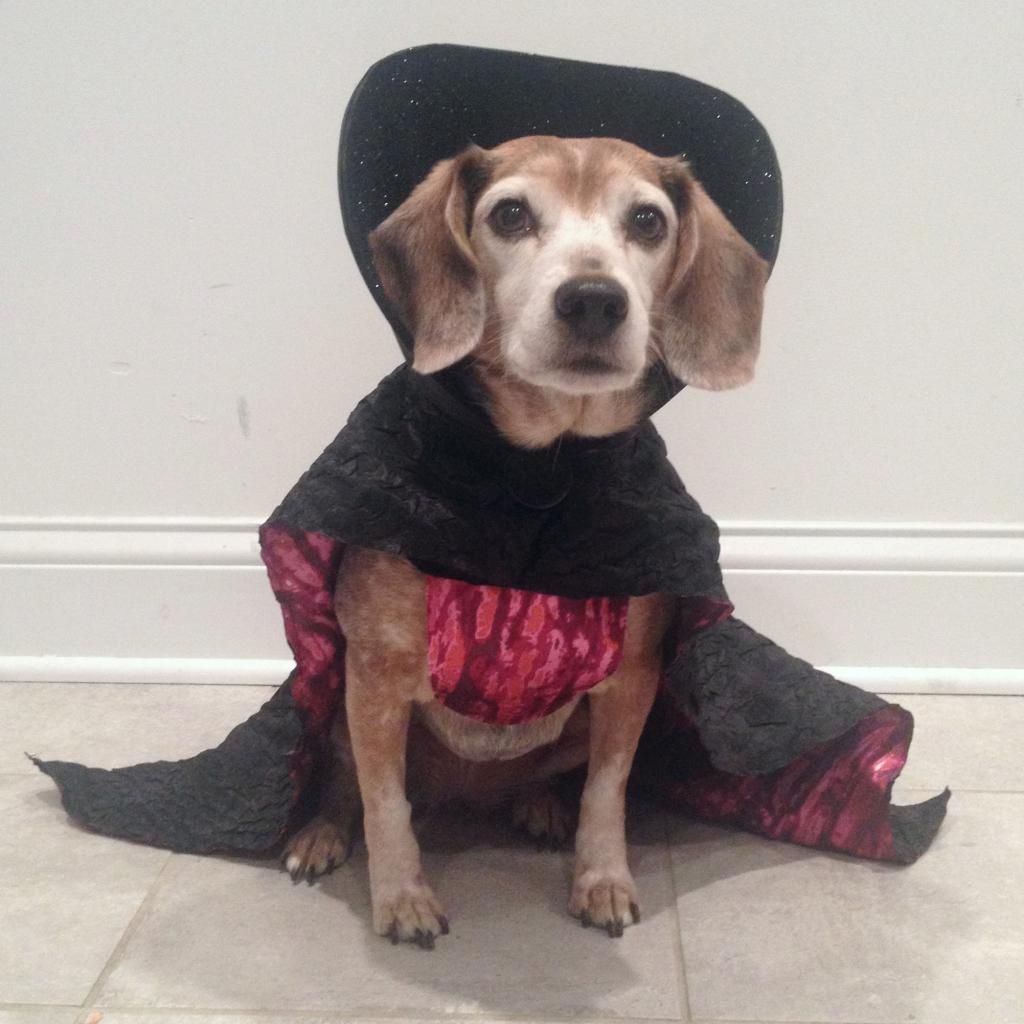
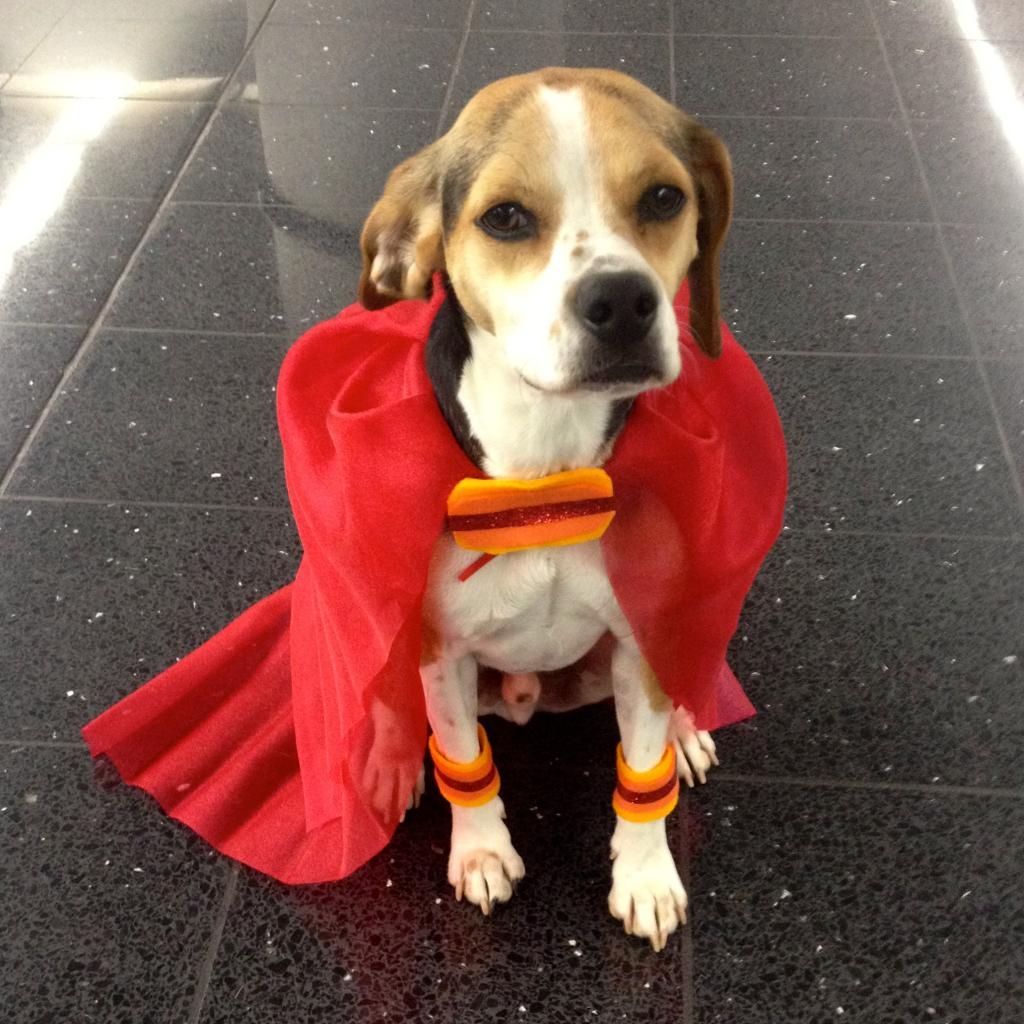
Costumed Canines - The Bloody Beagle


Don't be fooled by this adorable tiny dog. Her small size means the evil in this mastermind is even more concentrated.  In addition to mind control, via her cuteness, over humans, she takes every opportunity to make other pooches submit to her will with her tiny paws of fury. She is in constant battles with Sgt. Smashy over who will rule the tiny dog Kingdom, Puppytopia. 

Note- Sgt Smashy has yet to discover her weakness but we all know there are two things .... Treats and eyeball scratches. (She has really itchy eyes. )

Tuesday, October 28, 2014

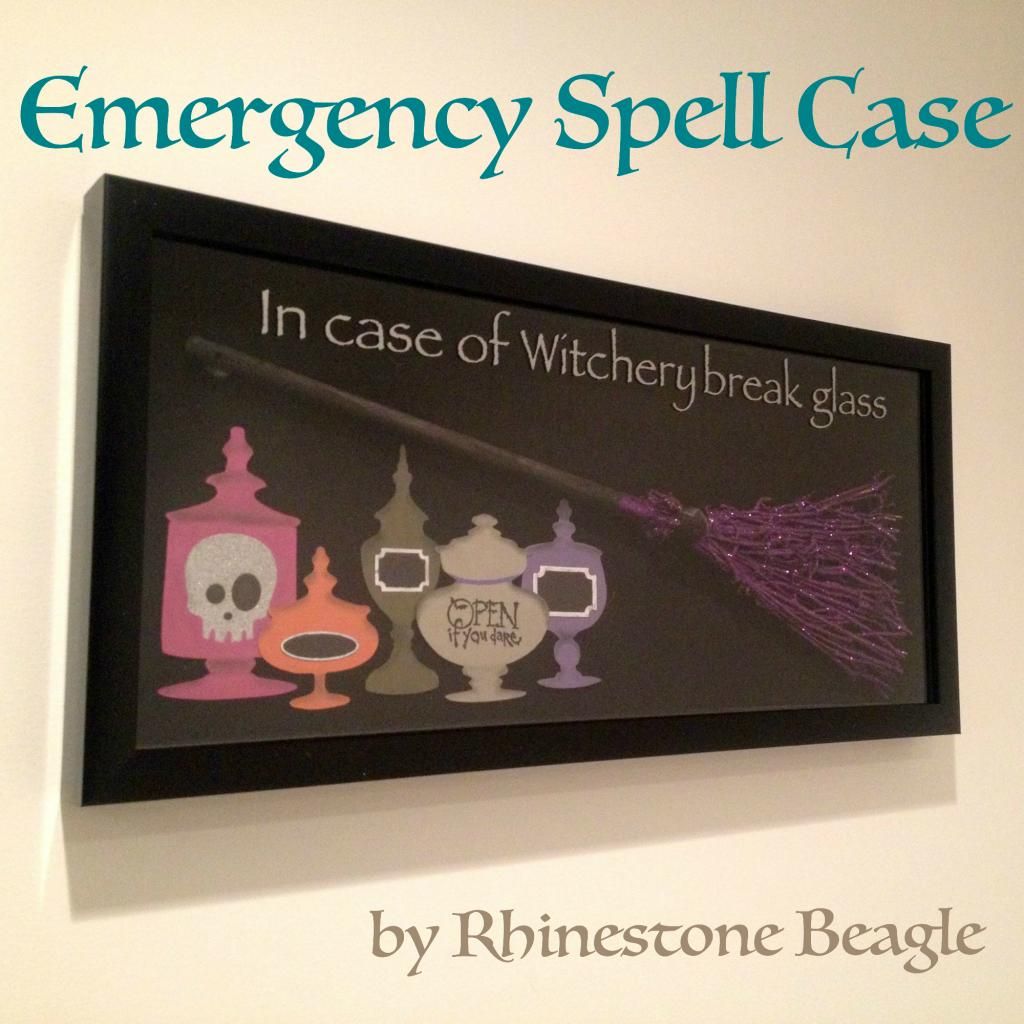
HTTC - Emergency Spell Case Tutorial


Here's an easy home dec project to add some spooky flavor to an empty wall space.  *If you don't a have a cutter like the silhouette or circuit just pick up some fun stickers at the local craft store.*

Supplies
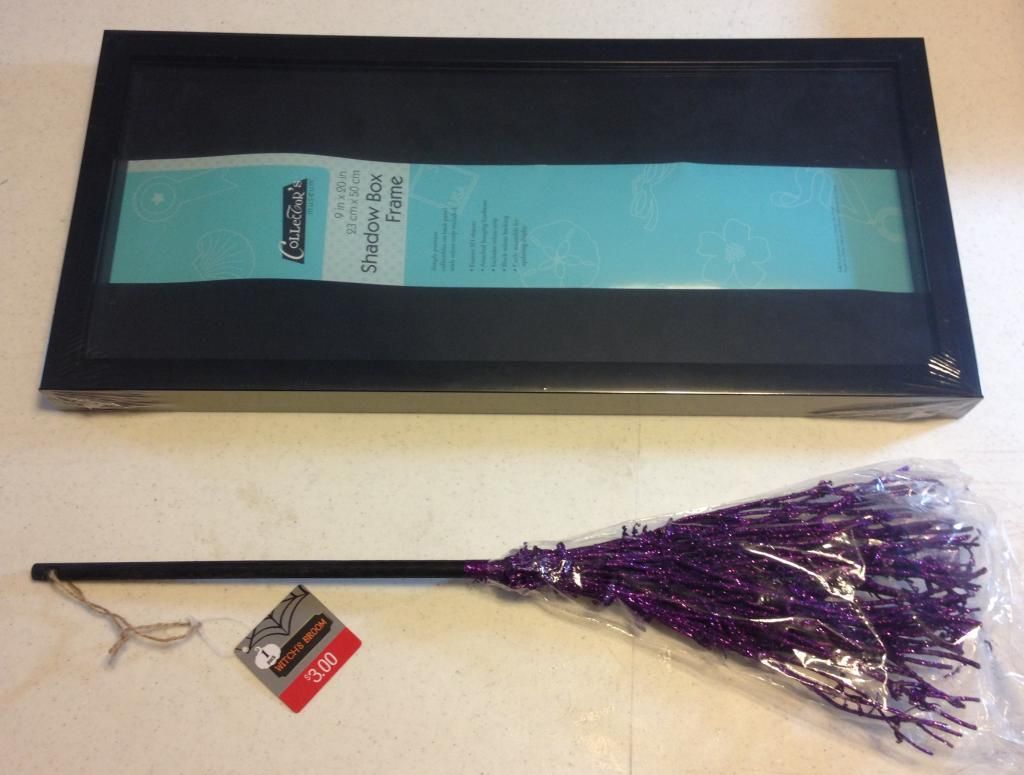
Small broom(I got mine in the dollar bin at target but you could easily make one with some sticks from the backyard.)
Shadowbox - one that will fit the broom
Sticky vinyl - This comes in a roll at the craft store.
Cardstock paper in various colors
Glue gun

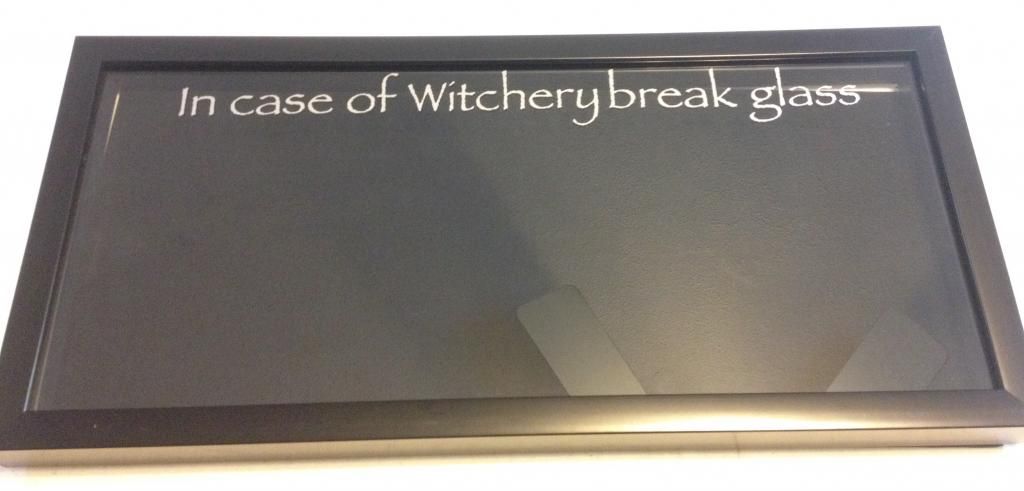
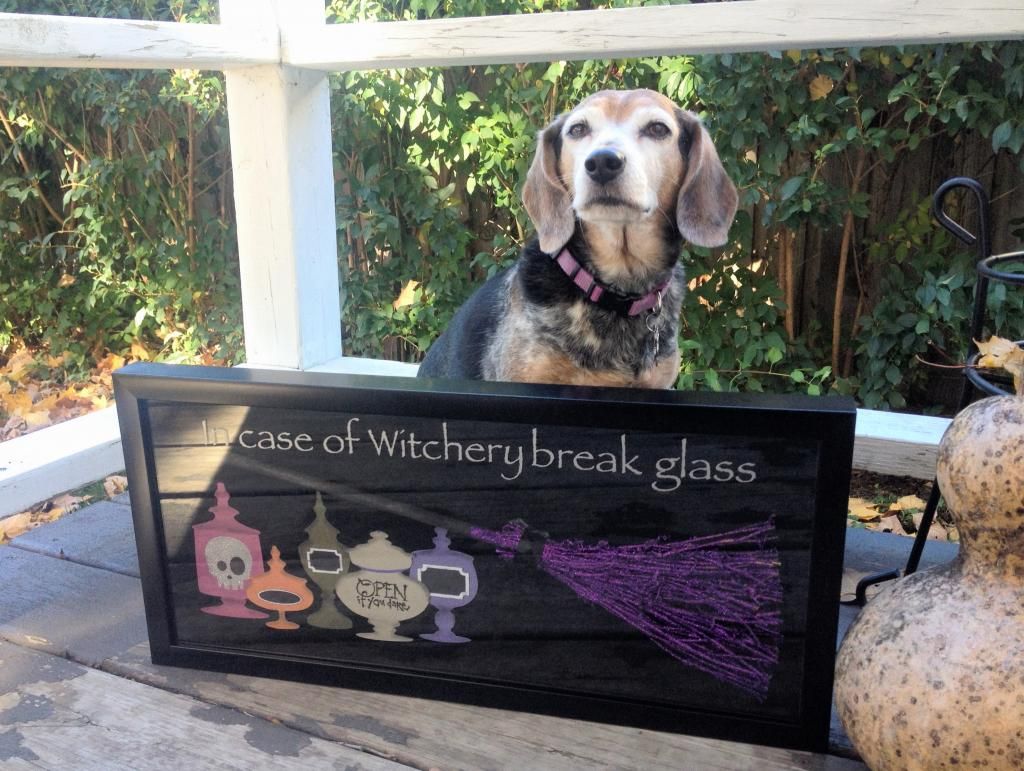
1.  First you will apply your letters.  I took out my underused Silhouette Cameo and cut "In case of Witchery break glass" from grey vinyl.  This was my first time using the sticky stuff and I have to say I love it.  Apply your letters to the top edge of the glass on your frame.

2.  Now you will need to take the back off and insert your broom.  I had to trim mine down a little but my kitchen scissors did the job just fine.
You can see the original broom was a hair too big for the frame.  
Hot glue it into place, making sure to leave a little room in the bottom corner for your potion bottles.  I glued at the top of the handle and at the base of the broom to make sure it was really stuck on.

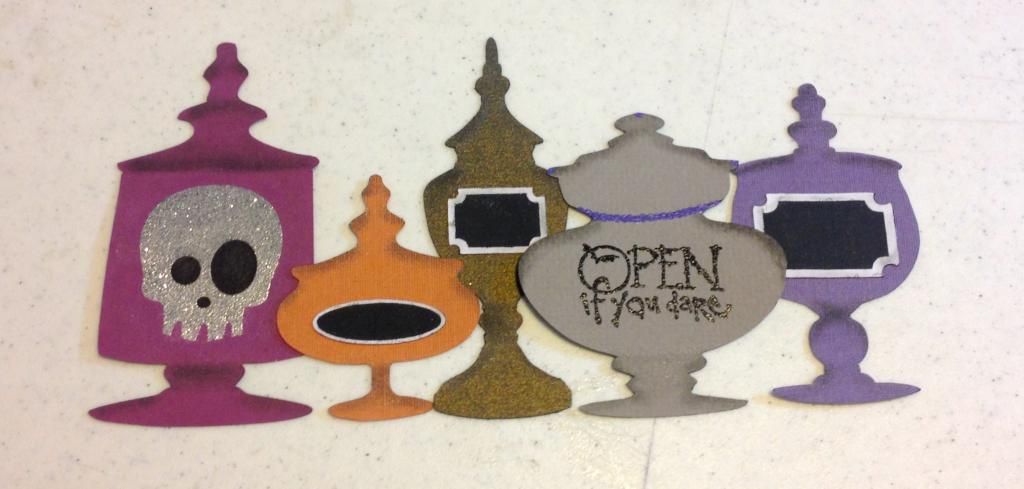
3.  Now you will need to make your potion bottles.  I used my Silhouette again for this step but you could just draw these out and cut them by hand.  Decorate them with glitter, embossing powder, stickers or markers.  I chose to use the glue gun to stick them onto the velvet backing that is in the shadowbox to make sure they would adhere for years to come.
DONE!  This is a super simple project you can complete in a weeknight.  Like I said above, if you don't have an electric cutter just pick up some letter stickers from Joann and get creative making your own potion bottles.  Gidget is our resident spell caster so her stamp of approval was very appreciated.

Cast on!
Anita

Monday, October 27, 2014

Costumed Canines - Super Bubs

I though long and hard about what type of superhero Abby would be.  She is way too silly to be anything hard core tough and has been known to hide behind her momma when other dogs come around so bravery is not her thing either.  She has tried to get the stuffed bunny we put out for Easter to throw the ball for her and has offered to trade her chewies for human food so she is too sweet to be a villain.  Naps are her weekend plans meaning super speed is out, and she could never stay focused long enough to even attempt to control someone mind.
So that leaves only one type of superhero.....the one that thrives in the imagination of little kids, complete with dad's clothes and a towel cape!

Mild mannered Abby by day, working a desk job for the man.

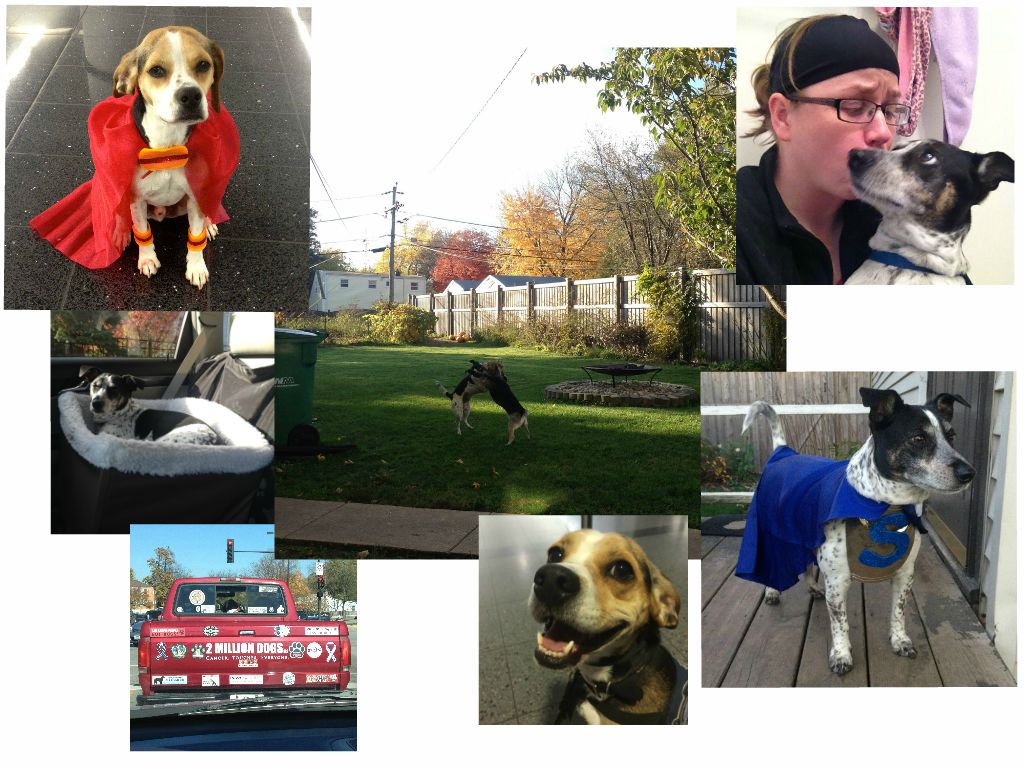
Super Bubs by night, Punisher underwear wearing vigilante keeping the streets safe for puppies everywhere. I've heard tell she might have a bit of a crush on Sgt. Smashy.

HTTC - Instagram Round-up 4


Wednesday, October 22, 2014

Costumed Canines - Sergeant Smashy

Tough as a tank and shaped like one too Sgt. Smashy has been standing up to the forces of evil since his birth.  He is the muscle of any outfit with brains to match, a rare combination.  He stands up for the little guy, being short himself.  He is the steadfast protector of the porch, car, house and anywhere else he resides from intruders furry or not.  Don't let the tough exterior fool you though; he's a pushover for a pretty girl...especially blonds.  

Little known fact - He's pretty vain, constantly grooming to make sure he looks super handsome in his uniform.  Always ready for a photo op or to flirt with the ladies in the neighborhood.

Monday, October 20, 2014

HTTC - Molasses Sugar Cookies


Fall is by far my favorite season.  The changing of the leaves is the most gorgeous reason we have to look forward to cooler temperatures after the glory of the summer heat.  But beyond the yellows, reds, oranges, and golds, we get even more reasons to love fall: pumpkins and squash, adorable little kid costumes during Trick-or-Treating, fall baked goods, hoodies, and possibly the best reason after those amazing leaves is the local fall festival.  I live out in the country and we are inundated with them during the month of October.  Hay rides, antique sales, and craft fairs are the staples of any fest, flesh it out with a carnival or possibly a tractor show and you have your Saturday planned out in rural NW Illinois. 
You can start a great fall fest morning with a rampant increase in Garage/Yard sales to catch the crowds, the wonderful aroma of fresh apple cider doughnuts sold by the local Boy Scouts or Kiwanis group, and finally a tour of the craft show at the high school equipped with the ever present bake sale to help raise money for worthy group.  This small town bake sale is where I got my inspiration to back up some yummy fall flavored cookies.  While my husband and father were off perusing the finest farm tractors the 1930’s and 40’s had to offer I took in the crafts and baked goods.  The craft fair had the normal offerings: Pampered Chef, booths full of knitted and crocheted items, smooshed wine bottles turned cheese trays, tied fleece blankets, and for some reason a guy who did custom paintings of sports figures, he did great work, but had a few to many Green Bay Packer Players displayed for a craft fair in Illinois.  Go Bears!
 There was a very nice quilt show tacked onto the craft fair.  The organizers wanted each person to vote for their favorite and even gave you a latex glove if you wanted to touch the quilts, to turn them over and admire the back or delve deeper into the stich patterns.  I voted for one that was an appealing mix of off white, a soft pink, and a sage green, the creator had named it “spumoni”.  Anita had recently taught me how to paper piece a quilt block so this show turned out to be much more interesting than I had originally thought it would be.  Seeing how I could manipulate the patterns in blocks to create a wondrous work of art proved quite the joyous adventure!   
 I had wandered a school full of pillow covers and handmade bird houses, I had admired hours of planning and stitching of fabric, I even managed to check out a few tractors in the ever present battle of red vs green, after all that I thought deserved a treat in the form of a bake sale goodie.  This one was to benefit the marching band, and from the looks of things the every parent had brought the A game.  Cakes and pies, brownies and cupcakes, popcorn balls and candies, snack mixes, and cookies of every kind all offered up by teenagers in ridiculously loud homemade band t-shirts.  I did not know they still made puffy paint.  We got some oatmeal raisin cookies and some small molasses buttons.  I adore molasses cookies but I never think to make them, well after I ate one of those buttons I was sold.  I was inspired to make a big chewy molasses cookie with lots of spice and fall flavor.  This whole recipe mixes up in a sauce pan but makes three dozen cookies, saving you from having to get out the mixer.  I added a candy corn to add a bit more fall feeling to the cookies, and because I love how cute candy corn is!
Molasses Sugar Cookies
3/4 cup soft butter
1/3 cup of you favorite type of molasses
1 cup sugar
1 egg, or egg substitute equivalent
1/4-1/2 tsp ground cloves (1/2 tsp will be quite strong)
1 tsp ground cinnamon
1/2 tsp vanilla
1/2 tsp salt
1/2 Tbsp + 1/2 tsp baking soda
2 cups all-purpose flour
Candy corn, optional

Melt the butter over low heat and let cool.  Add the molasses, sugar, and the egg and beat well. Mix in the cloves, cinnamon, salt, and baking soda.  Mix in the flour.  Chill in the pot for 60-90 minutes, it won't be overly firm.  Preheat oven to 360.  Roll into 1 inch balls and toss in sugar, you do not need to flatten.  Bake for 10-12 minutes.  Press a candy corn into the center of each cookie when they come out of the oven before you cool them on a rack.  Store the dough in the refrigerator between batches. Makes 36+ cookies.

I will never forget to make molasses cookies again with how easy and tasty this recipe is. So chewy and full of depth, each bite makes me happy! I hope your fall baking makes you feel happy and full of life, the way fall should  

Kelly   


HTTC - Instagram Round Up 3


Sunday, October 19, 2014

Costumed Canines - Dino-mite


This is a rare still picture of him because Dino-mite is as explosive as his name.  He has superfast speed powers and can leap over small children with ease.  Forget the energizer bunny.  If we could tap his energy reserves our quest for clean energy would be over.  Try not to blink when he's around cuz you'll miss him entirely.  He is also very courageous but sometimes to a fault, picking fights with much larger dogs.

Origin Story - Dino + Radioactive tanker spill + TNT storage facility.  Need I say more?

Saturday, October 18, 2014

HTTC - Witchy Wreath Part 2

Part 2 of this tutorial basically consists of making the witch hat form in the middle.  You could use this technique to make a center form for any holiday decor.

Supplies
Deco mesh wreath from part 1
Craft Styrofoam board - mine was   I got it at Joann in the styrofoam/wreath area.
Black fabric - I chose a polyester cuz it will be outside.
Black craft felt sheets - 2 pieces
Ribbon - 20" piece for hat band
Feather spike - Also in wreath section
Puffy Paint - 2 colors
Small gauge wire - 2 pieces, 12" each
Pipe cleaners - use the same color as in the part 1 tutorial
Glue gun and sticks
Scissors
Box cutter or something to cut the foam

*I've numbered a lot of the photos and they will be notated in each step with a colored number.*

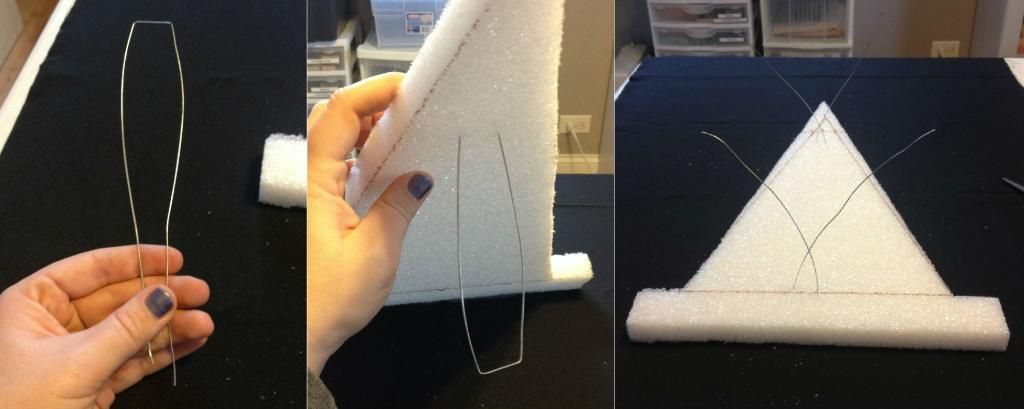
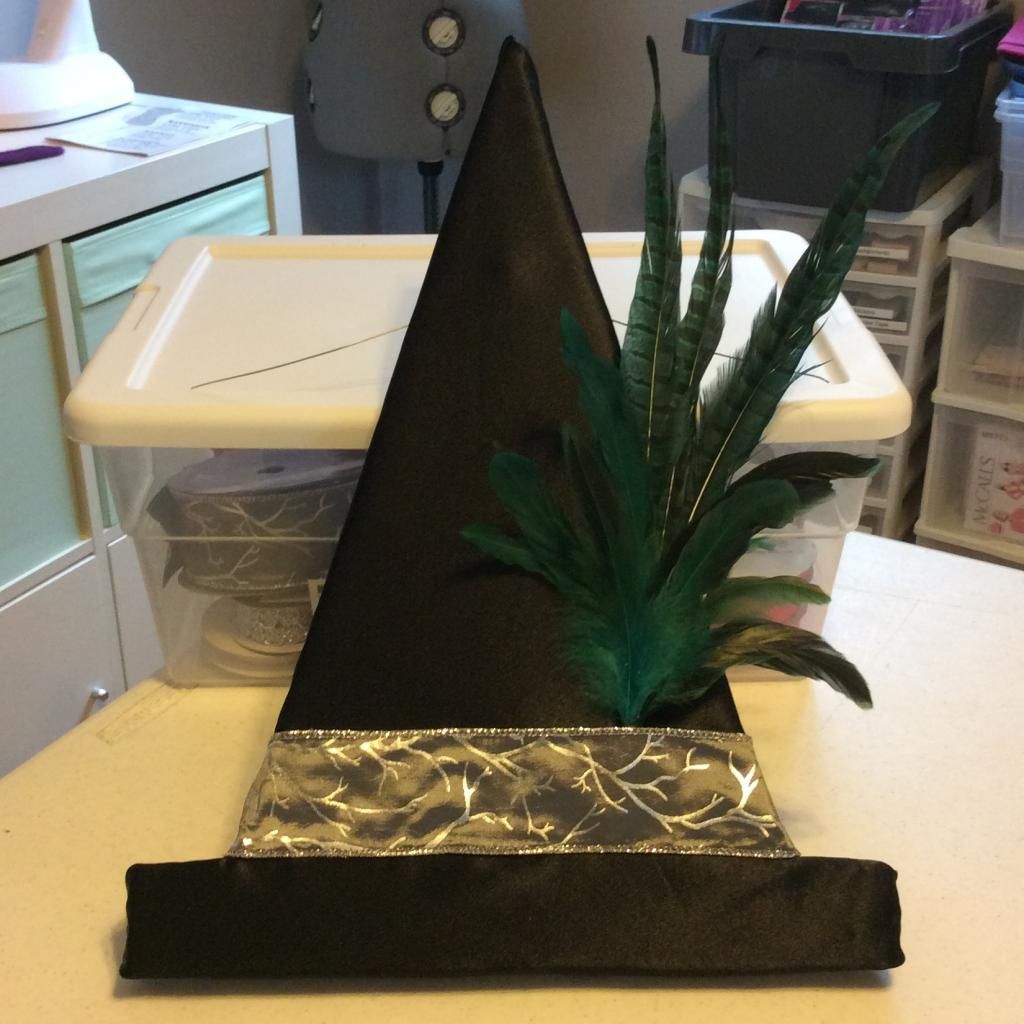
1.  First you will need to cut your hat shape from the foam.  I drew a 1.5" X 12" rectangle for the brim and then a tall triangle on top.(1)  Now use your box cutter/blade to cut it out.(2)  EASY!

2.  Next we will insert your two pieces of wire through the foam.  Bend the wire in half will a squared off edge like in the picture.  You can just push the wire through the foam till the squared edge is flush with the surface.  I put one towards the top and another closer to the base.

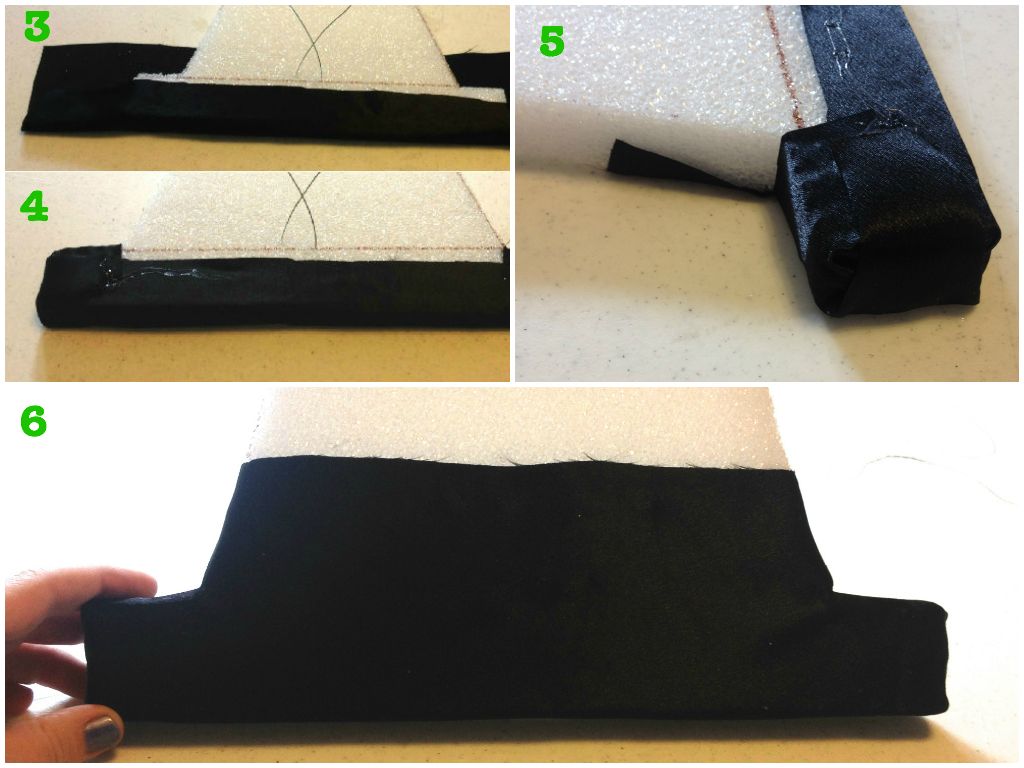
3.  Now we will cover the hat form with fabric.  You basically just wrap it like a present, using the glue gun instead of tape, but in two steps.  Do the brim first following the photos from 3 through 5.  When you are done the front should look like 6.

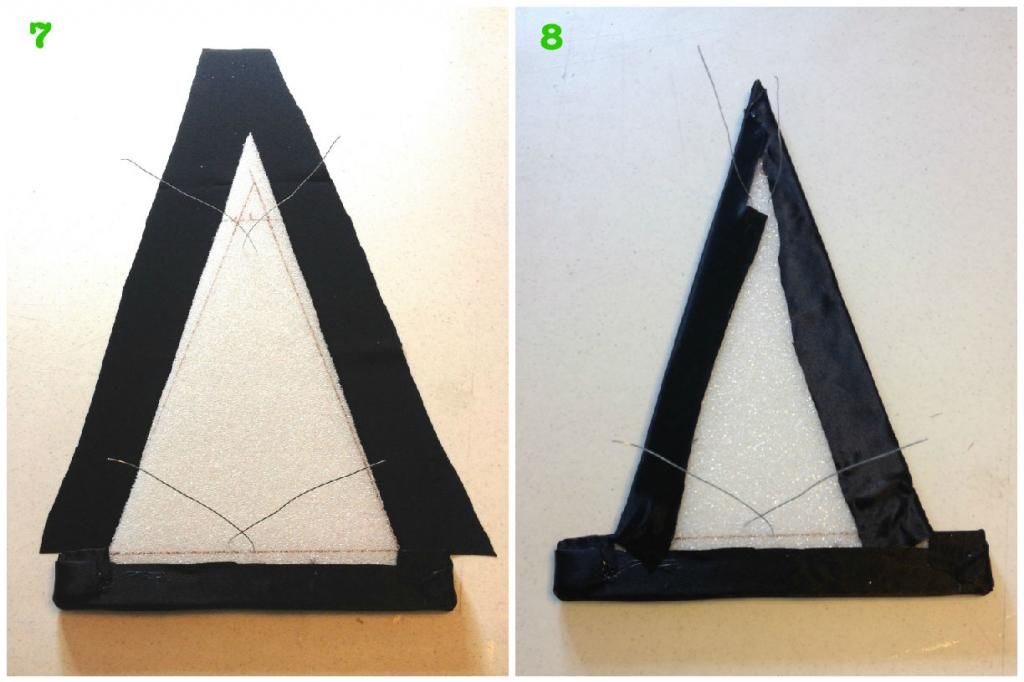
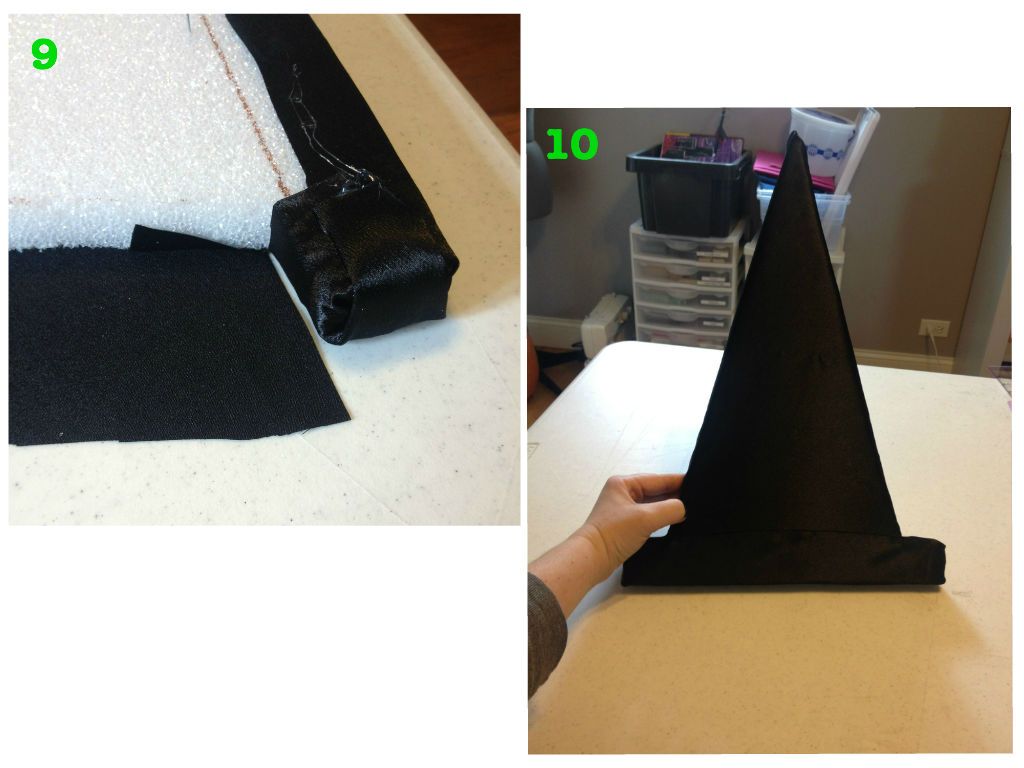
Now you will wrap the top "triangle" part in another piece, keeping all the edges wrapped around the back of the form.  There will be one raw edge on the front where you overlapped the pieces but don't worry we will cover it.

4.  Next you will add your feather spike.  I trimmed mine down with a wire cutter and glued it on right about where the band goes above the hat brim.  That way it will be covered by the ribbon.  Be generous with the glue here.  We don't want it falling off.

5.  Now you will add your ribbon hat band covering the raw edge of fabric and the glued end of your feather spike.  Wrap the ends around to the back and glue in place.

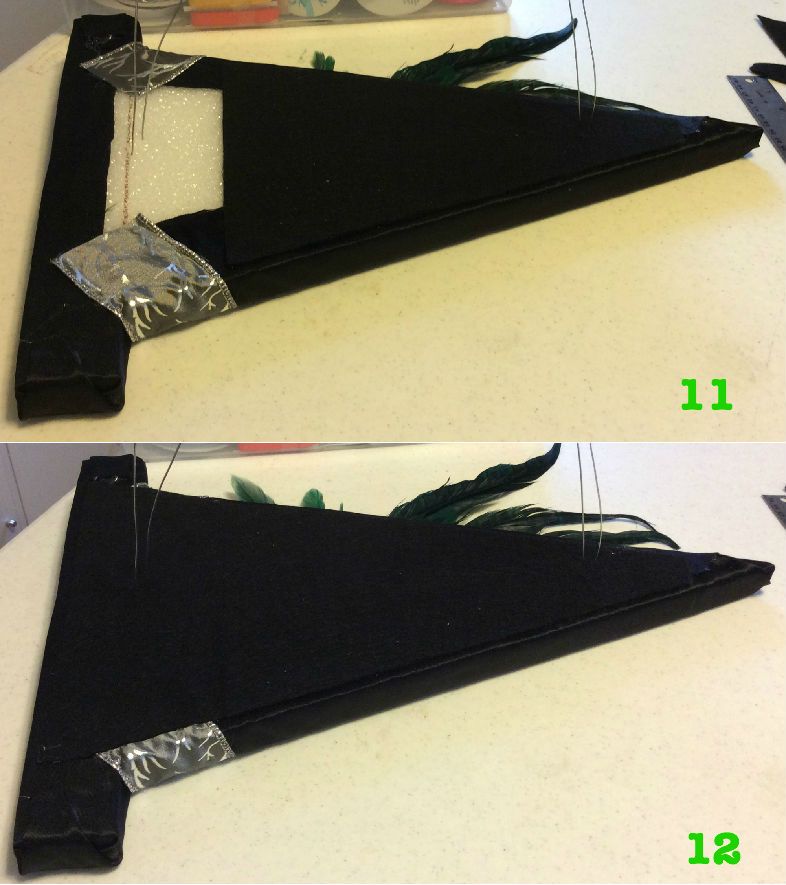
6.  This is really an optional step but I like my wreaths to look clean from the back since I can see them through the window.  Take your felt and cut it to fit over the back of your form coming about 1/4" from the edge.  I had to do this in two pieces since my hat was bigger that the felt I had on hand.  You can poke little holes into the felt for the wire to go through.  I also recommend adding a bunch of extra glue around the wire when applying the felt.  This will keep them extra secure.

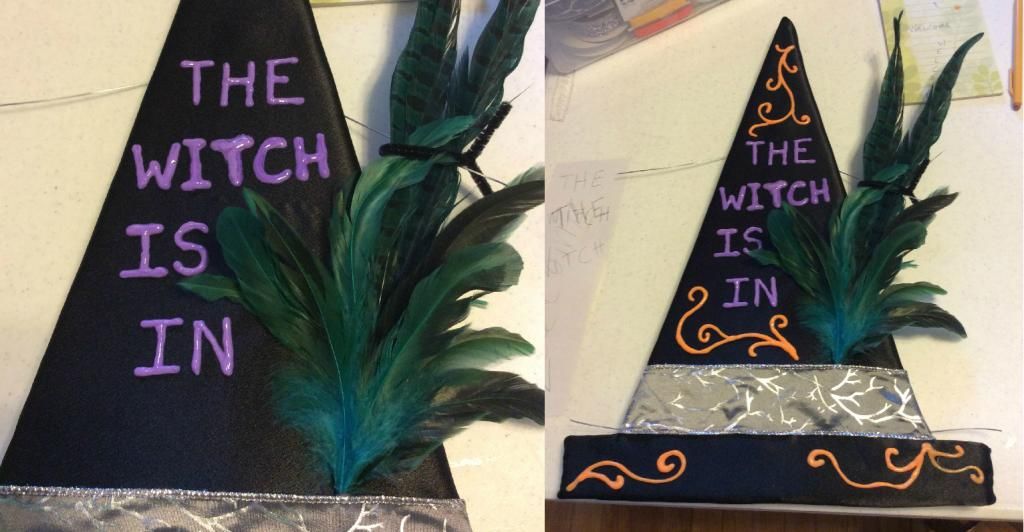
7.  Now we will break out this paints I had in the supply list to add our festive message.  If you have another way you'd like to add the letters instead have at it.  I painted the letters first and then filled in some of the blank spaces with a few swirls in a contrasting color.  Note I tied the feathers out of the way while I painted.  
The puffy paint takes a while to dry so watch a spooky movie or do a load of scary laundry.  When it's dry just attach the hat to your wreath using the wires on the back.  

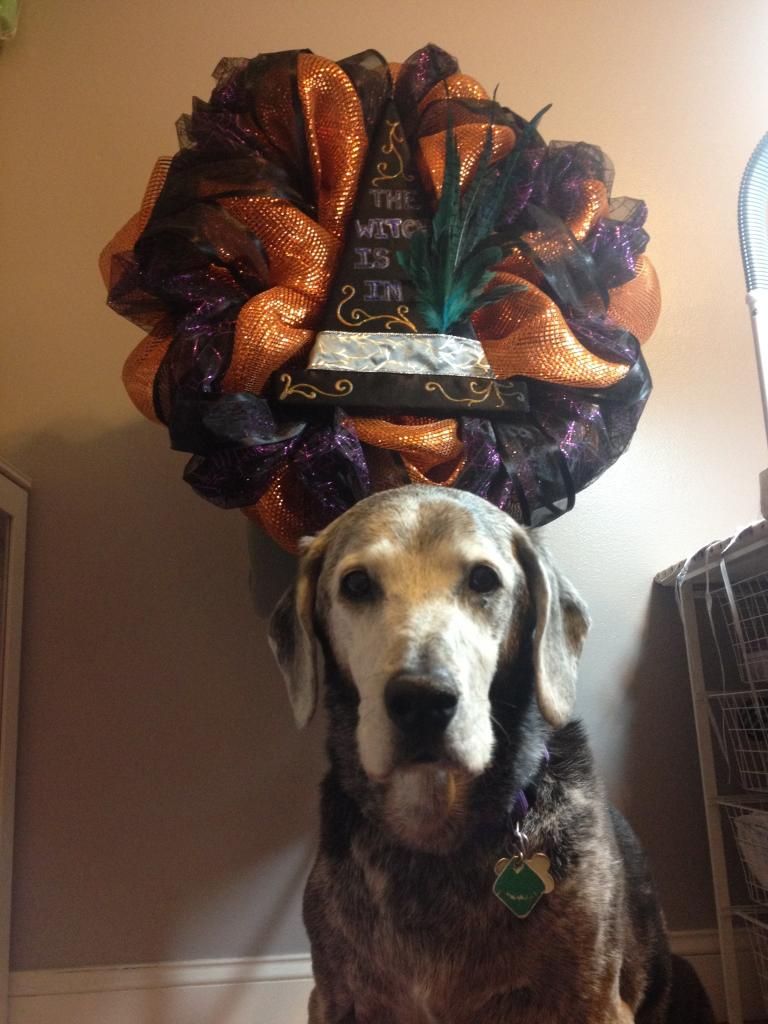
TADA!  You're done.  Now you can hang it up and just wait for the complements to roll in.  Here's Sadie in a couple dramatic poses with the finished product.


Cast on!
Anita

Tuesday, October 14, 2014

HTTC - Witchy Wreath Part 1

I decided to split this tutorial into two bite sized posts to make it easier to digest.  The first will show you how I put together a deco mesh wreath for the base and the second will be all about decorating.  Lets get started.


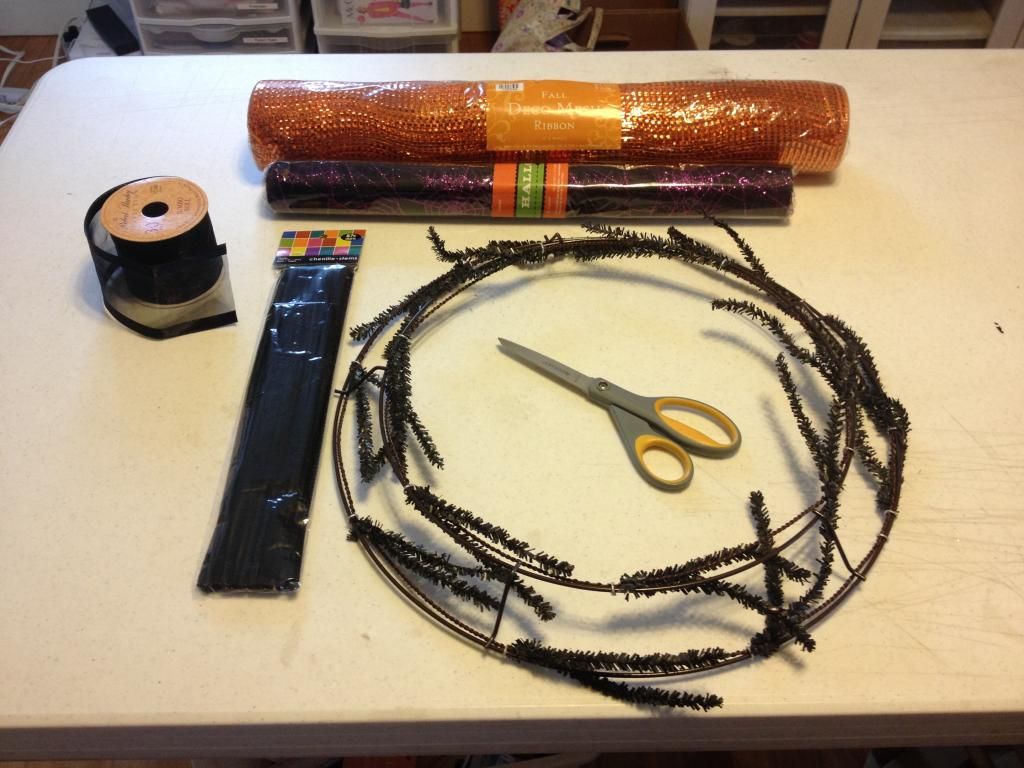
Supplies

Work Wreath - I got mine at Hobby Lobby.  Try to get one that will blend in with the colors of mesh you're using.
Deco Mesh - I used one roll of a metallic orange kind and another roll that ended up being more of a decorative tule.
Ribbon - Wired kind really helps with shaping.  Wish I had thought of that before I put this one together.
Scissors
Pipe cleaners (just in case)


1.  First you will want to adjust all the twist ties on your work wreath so they are sticking straight out instead of lying against the frame.  This makes it much faster and easier to attach your mesh.  Sorry there's no pic of this.

2.  Now take your first/major color and fold the end over by about 6-8 inches and attach it to one of the ties on the inner rim of the wreath.

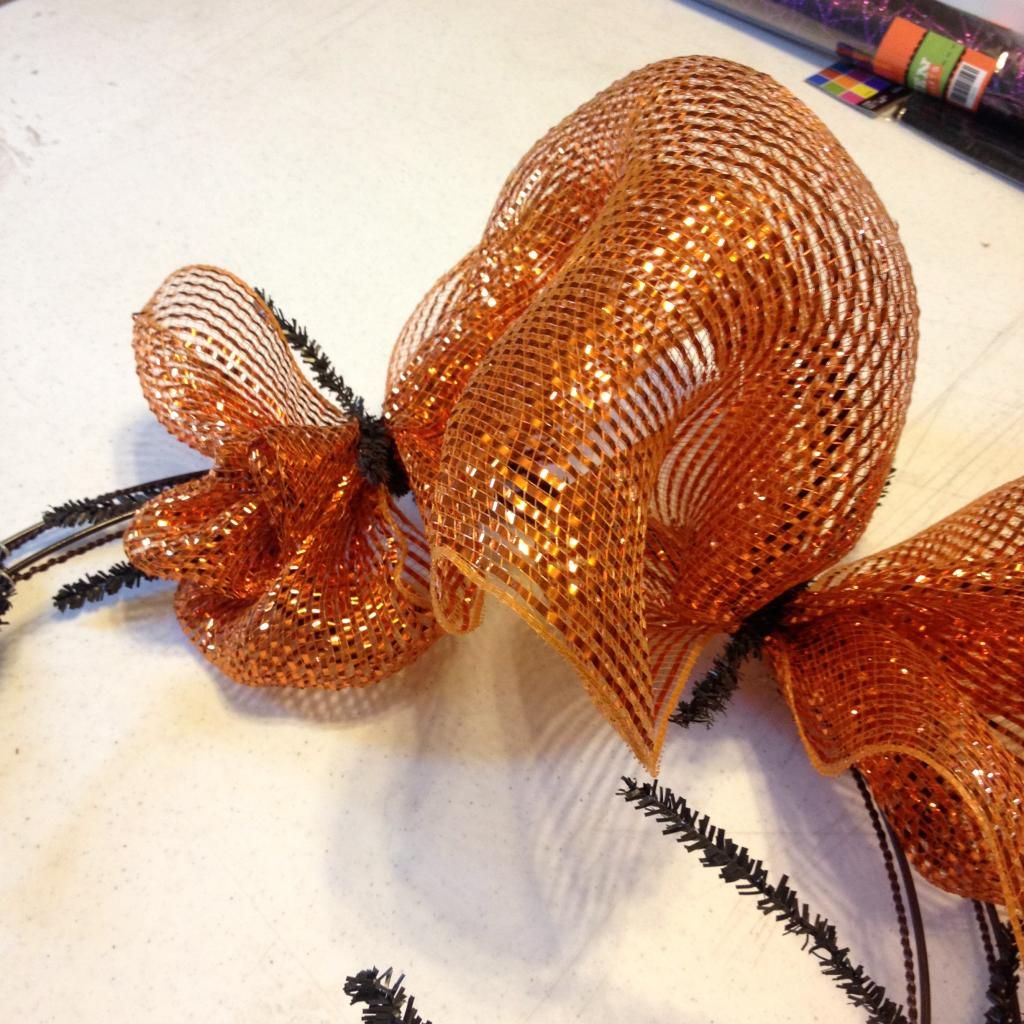
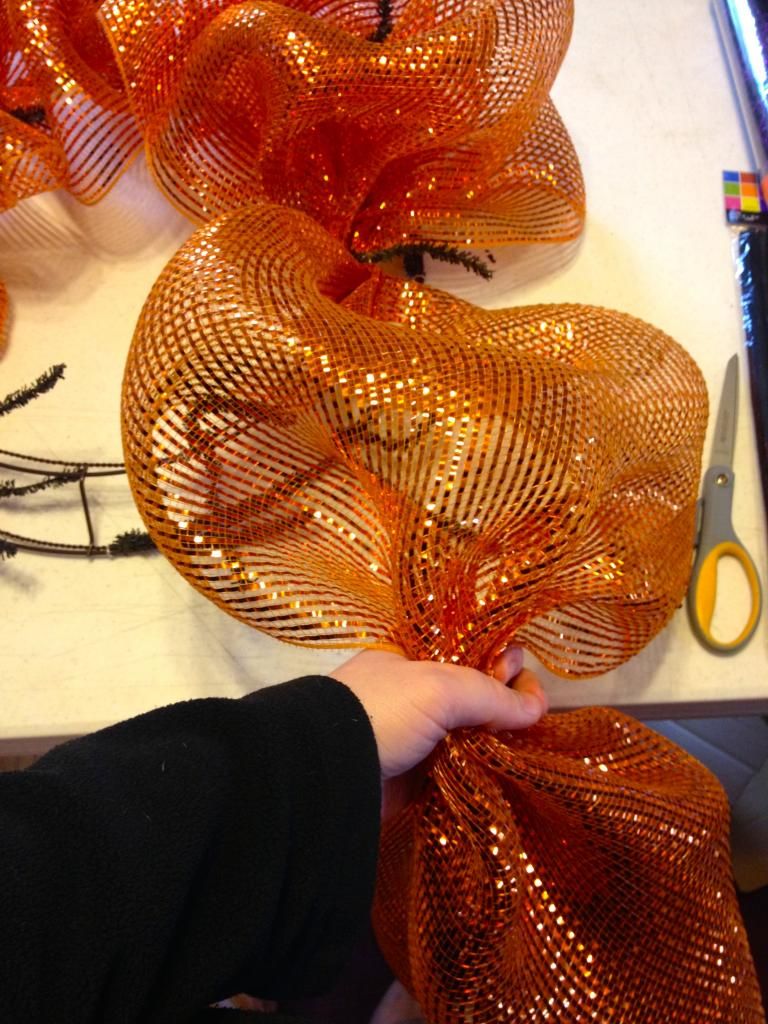
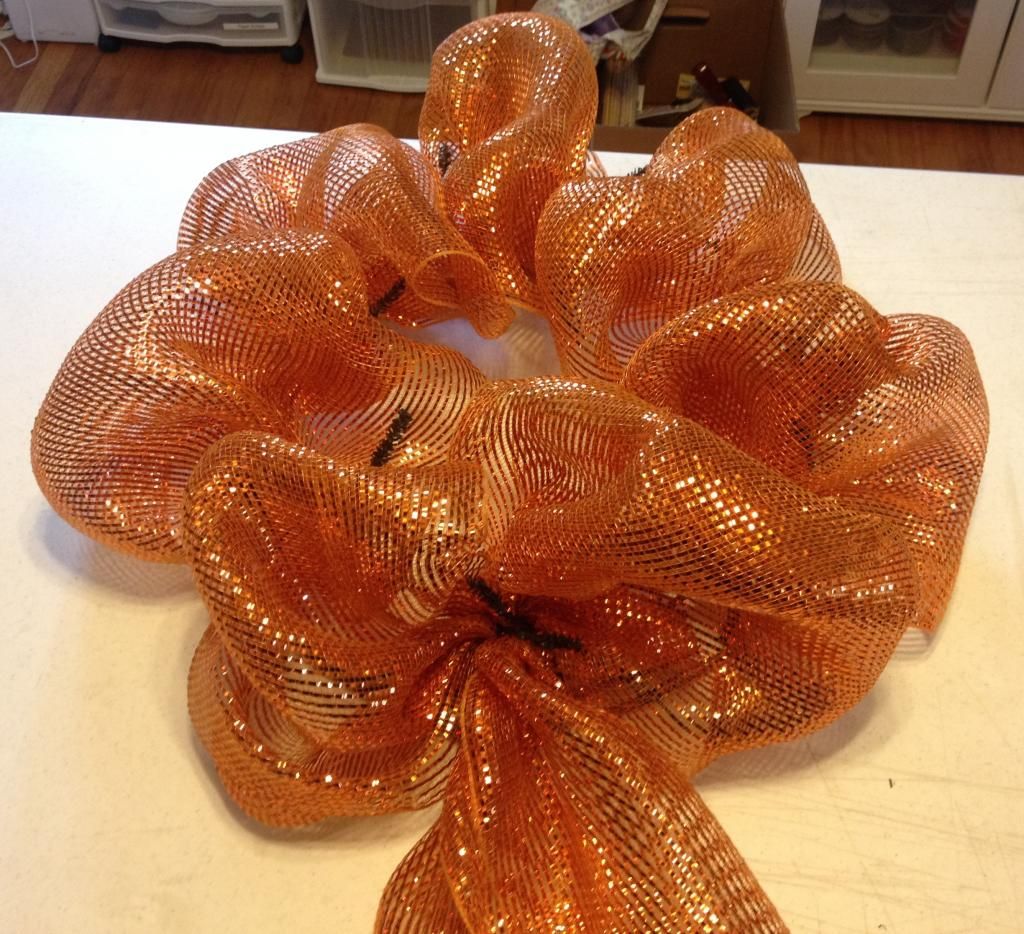
3.  Now about every 12 inches or so down the roll you will be gathering to make the big bubbles of mesh.  Run your hands down the mesh so you are about 12 inches or so away from your first tie.  Gather the mesh into your fist and attach it to the next tie.  It will make a bubble/hump like this.
Continue gathering and attaching your mesh to the wreath until you get all the way around on the inner part of the wreath.

This is just the inner ring of ties.
After you have finish the inside ring of the wreath you'll do the same thing on the outer ring.  Don't bother cutting the mesh.  Just start attaching it and run around the whole thing.  When you get to the last tie to complete the circle just cut about a 6-8 inch tail and fold it over to hide the raw edge and attach it to the tie just like you did at the beginning.

4.   Now we will add your second color/decorative tule.  I love this one I found that is shear except for the glittery spiderwebs.
You will be doing the same process as with the orange mesh.  The only difference I choose to do is to zig zag between the inner and outer ties to make it look more random.  You can see how I gather the tule to make a poof below.  I insert and tie it in the same way as the mesh.  I just did one pass zig zagging all the way around and tiring it off in the back like with the mesh.
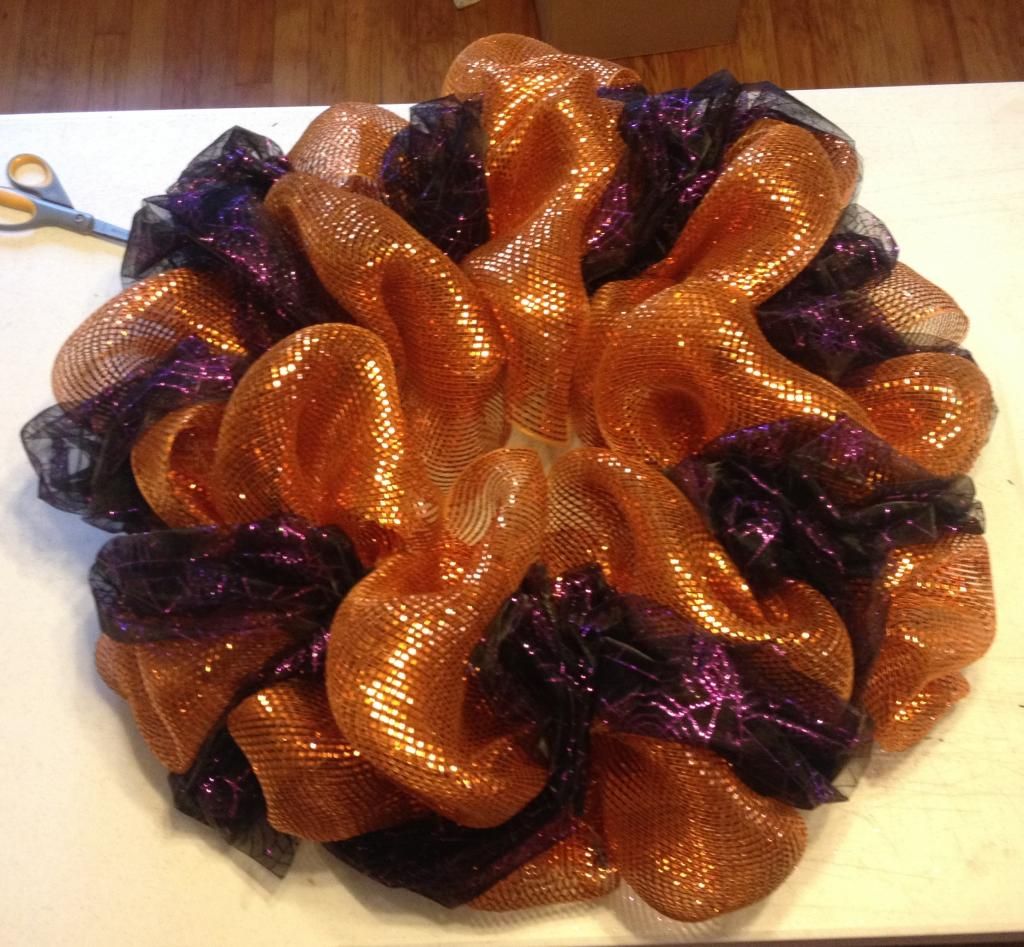
Orange mesh + purple web tule

5.  Final step for this part of the tutorial is to add the ribbon.  It is done the same way as the previous two steps just not much gathering cuz its pretty narrow.
I tried to stagger my ribbon from the tule to make them overlap a little but you can do whatever you want.  This is the step where you would use the optional pipe cleaners.  I keep them handy so in case there isn't a tie where I want the ribbon to go I can attach one to the frame as needed.
Mesh+tule+ribbon
Feel free to adjust and shift around any of the fabrics until you get a balance that's just right.  I like a lot of color towards the middle so the center piece we will make next, that is black, will stand out.

YOU'RE DONE!  Mr. Biscuit volunteered to inspect my wreath and I got the paw print of approval.

Stop by Friday to see part 2 of this tutorial.

Craft on!
Anita

Saturday, October 11, 2014

Costumed Canines- Lady Catnap


The Lady Catnap is an International dog bead thief on the FBI's Most Wanted list.  She uses her skills to sneak into other dogs' beds, sometimes even while these unsuspecting dogs are still in them, and nab them for her own.  She only goes after the most high end beds such as: Ruff Lauren, Dogche and Gabana, and Cat Spade.

Her only weakness...if her secret got out to the International dog bed community that her favorite bed was in fact an old Harry Potter sleeping bag she would be ruined!

Friday, October 10, 2014

HTTC Paper Haunted House Decor

Thanks so much to the self-proclaimed "two crazy ladies", Kelly and Anita, of www.rhinestonebeagle.blogspot.com for inviting me to participate in their 
fourth annual Howl-oween Tricks & Treats Craftathon
I am so THRILLED to be here!

On my blog, www.paperseedlings.com, I bring to my readers papercrafting inspiration, planting little "paper seedlings" in their creative brains. Most of the time, my content revolves around cardmaking. 

However, for this Craftathon, I stepped a bit outside my personal creative box, and created something a bit different: a piece of Halloween decor that measures 6 1/2" x 8 1/2". I know, it's not A LOT larger than my typical greeting card, but the way it's made and the numerous steps involved make it a much more intense project than a greeting card that the recipient may just THROW AWAY (GAAASP!)

I am not accustomed to taking photos of every step of my creative process. Thus, I was a bit remiss at times in being faithful to documenting each of the steps. If there is not a photo present, I will fill you in with words on what's going on.

This is my Haunted House creation. It took me several hours to complete, what with all my trial and error. I will do my best to condense this process for you, so if you would like to re-create my version or make one that is your very own, it won't take nearly as long!


The background of this project is a variation on the Faux Silk technique. I had this really COOL tissue paper that was a sparkly blackish-grayish-silverish that I thought be be ideal and SO MUCH FUN to use in this project.

My first step was to choose a piece of cardboard cut to 5 1/2" x 7 1/2". I cut a piece of the tissue so it was somewhat larger than the cardboard:


The first step in this cool Faux Silk process is to crush the piece of tissue in your hands -- that's right: into a ball! -- open it slightly, recrush, open, recrush. Do this 3-4 times. On your last crush, gently open it, but don't flatten it. You NEED mountains, valleys, rivers. Yes, a veritable map of the terrain of a stretch of land. 


Completely cover one side of the cardboard with Stampin' Up!'s Glue Stick. Be extra careful with the corners and the edges so the tissue adheres well. Gently lay the cardboard, glue side down, onto the crushed tissue, and press it down. Turn it over, and with your fingers gently press all the little veins into place onto the glue. DON'T RUB IT! Rubbing it will smooth out the character of the piece too much. Start slowly. You can always press down some more, but once that tissue is flat, it stays flat. 


Turn the extra edges to the back of the cardboard and neatly adhere it in place, making the sharpest corners you are able. Be careful when you are stretching the edges to the back that you don't pull too hard and flatten the veins that way. Give it a final pressing, and your result should look something like this:


I wanted to do another technique called Cracked Glass on the spooky moon behind the house. To do this, I used the 1 3/8" Circle Punch with Pumpkin Pie cardstock. I completely covered one side of the circle with VersaMark ink. I then dumped over the circle an unusually thick clear embossing powder that Stampin' Up! no longer carries. But I think you can still find something similar in craft stores. With my heat tool, I heated it up until it was melted. 


This is what it looks like after only one coat. Wait a few ticks for it to cool somewhat, then repeat this process: VersaMark, thick glossy embossing powder, heat to melt. Do this until you have four layers of this embossing. Then . . . stick it in the freezer! Yup! After about 15 minutes, it should be ready for cracking. But, if it's in longer, no worries. 

Anyway, once you take it out of the freezer, immediately start bending it in your fingers to give it cool spooky cracks. If you don't get enough cracks the first time, it can be refrozen, and worked on again. If you STILL aren't satisfied, heat it up with the heat tool again, and start the freezing process all over again. (You will see later in this post how the cracking on my moon turned out. Stay tuned.)


With black ink, I stamped my haunted house onto Smoky Slate cardstock. I then cut it out with one of the Framelits from the Apothecary Accents set in my Big Shot. Do you see the stamped moon on the image? That's what I measured to decide on the size of my Cracked Glass moon.


Since this Framelit only comes in one size, and I really wanted to surround it with a similar frame in Perfect Plum, I cut another of the shapes from the purple cardstock. 


Originally, I had planned to do this matting with TWO pieces of the Perfect Plum, but discovered that only one was necessary. Thus, the two cut pieces below. It was the two pieces cut horizontally that I ended up using. Ignore the long skinny piece. 


My next step was, in my opinion, the toughest part of this project. I wanted to slip  my moon behind the part of the house where the moon was in the stamped image. 

For years, I have enjoyed doing Scherenschnitte. That is always done on much thinner paper. Doing fussy cutting on cardstock is LOTS more difficult. So, I was not able to get the clearest cuts that I would have liked. 

Anyway, once the cutting was done, and leaving a bit of the stamped circle intact, I glued my cracked moon in place behind the house. 


To get the cracks and spooky features of the moon to show up a bit better, I rubbed some black ink into the cracks with a sponge. 

This photo shows the cracked moon a little closer, as well as the less-than-perfect cutting job I did:


After my moon was in place, I added glue to the back of the gray Framelit piece, and adhered the top and bottom of my purple Framelit, leaving a gap in the middle of the gray piece so the purple extended beyond the gray on the top and bottom. 


As I noted, my original intent was to do this with two pieces of the purple so it not only extended on the top and bottom, but on both sides also. Nope. I hated this look. And it was just too naked like this. (Plant some MORE Paper Seedlings!)


I took out my Ovals Collection Framelits, and cut an oval from the Perfect Plum that was the ideal size to add to my mat. I added the oval behind the purple I had already adhered. It was just right.


At this point, I was pumped, and forgot about my camera. But, I'll share what I did. 

I decided that I would pick up a bit more of the Pumpkin Pie color of the moon, and mat the entire piece in more of that. I started placing the pieces onto this as I came up with ideas. 

Spooky sky was added around the house with sponged Smoky Slate ink. That nicely added to the creepy feeling of the haunted house and broke up the flatness of the cardstock alone.

I punched triangles from the Smoky Slate and the Perfect Plum cardstock with the Triangle Punch, and placed them along the edges. The triangles didn't have enough oomph, so I sponged the edges of each one with Smoky Slate ink. Laid them in place. Hmmm. 


I really liked the Pumpkin Pie mat, but the piece still needed more "spookiness". I had purchased from Stampin' Up!'s Clearance Rack their Halloween assortment of Washi Tapes. I checked those out and liked the skull design. I decided to cut another piece of scrap cardstock 1/4" larger than the Pumpkin Pie edge. But, before gluing that in place, I covered the edges of this new piece with the Washi Tape. I love it!


I tried a few types of ornamentation on the triangles. In this case, I had punched out 1/2" circles from the Smoky Slate cardstock and inserted smoky-colored brads in the centers of each circle. I decided to not keep these. But, I DID keep the cool antique button I found in my button stash that I added below the house.


I then tried alternating colors of 1/4/" dots on the triangles. Nope. Too circus-y. Plant some more Paper Seedlings . . .


I ended up adding 1/8" dots punched from black paper to the centers of the "circus-y" dots, and I was happy.


One more view of my final result:


My 11-year-old mutt, Harley, was helping me throughout most of this process, but then he decided he wanted to go outside. So I absently let him out, and went back to work. 

It wasn't until I was finished that I remembered that I hadn't taken a photo of him helping me! Oh no! So, I got a pic of him looking longingly in at me through the window. Say "hi", Harley!


Once again, thank you SO MUCH, Anita and Kelly, for letting me share my creative process with you and your readers. 

If you'd like to catch any more of my creative inspirations, come visit me at my blog, www.paperseedlings.com. I post every Sunday and Wednesday. I would love to see you there!

Haunting
Smiles.