Showing posts with label wreath. Show all posts

Saturday, October 18, 2014

HTTC - Witchy Wreath Part 2

Part 2 of this tutorial basically consists of making the witch hat form in the middle.  You could use this technique to make a center form for any holiday decor.

Supplies
Deco mesh wreath from part 1
Craft Styrofoam board - mine was   I got it at Joann in the styrofoam/wreath area.
Black fabric - I chose a polyester cuz it will be outside.
Black craft felt sheets - 2 pieces
Ribbon - 20" piece for hat band
Feather spike - Also in wreath section
Puffy Paint - 2 colors
Small gauge wire - 2 pieces, 12" each
Pipe cleaners - use the same color as in the part 1 tutorial
Glue gun and sticks
Scissors
Box cutter or something to cut the foam

*I've numbered a lot of the photos and they will be notated in each step with a colored number.*

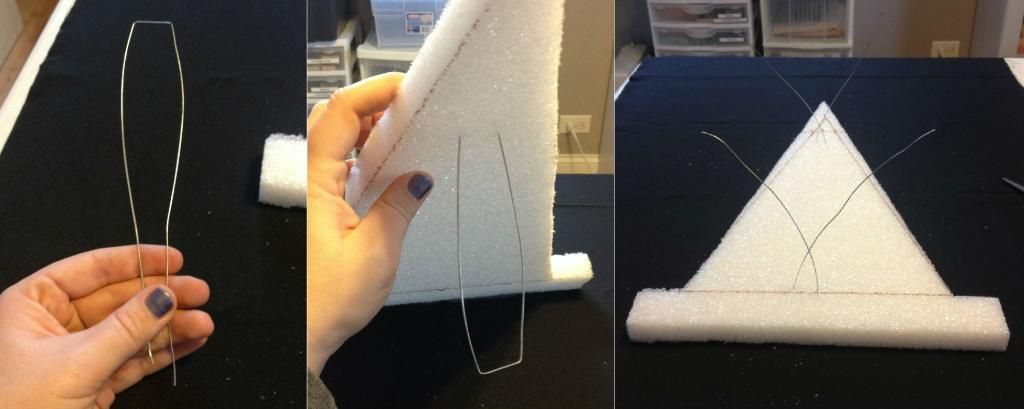
1.  First you will need to cut your hat shape from the foam.  I drew a 1.5" X 12" rectangle for the brim and then a tall triangle on top.(1)  Now use your box cutter/blade to cut it out.(2)  EASY!

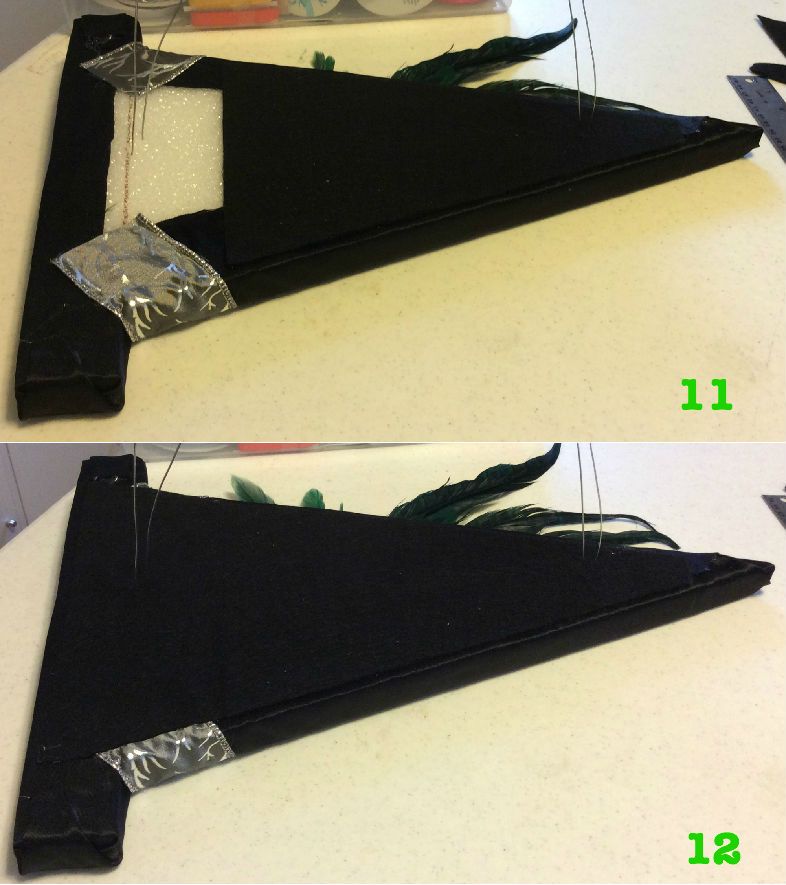
2.  Next we will insert your two pieces of wire through the foam.  Bend the wire in half will a squared off edge like in the picture.  You can just push the wire through the foam till the squared edge is flush with the surface.  I put one towards the top and another closer to the base.

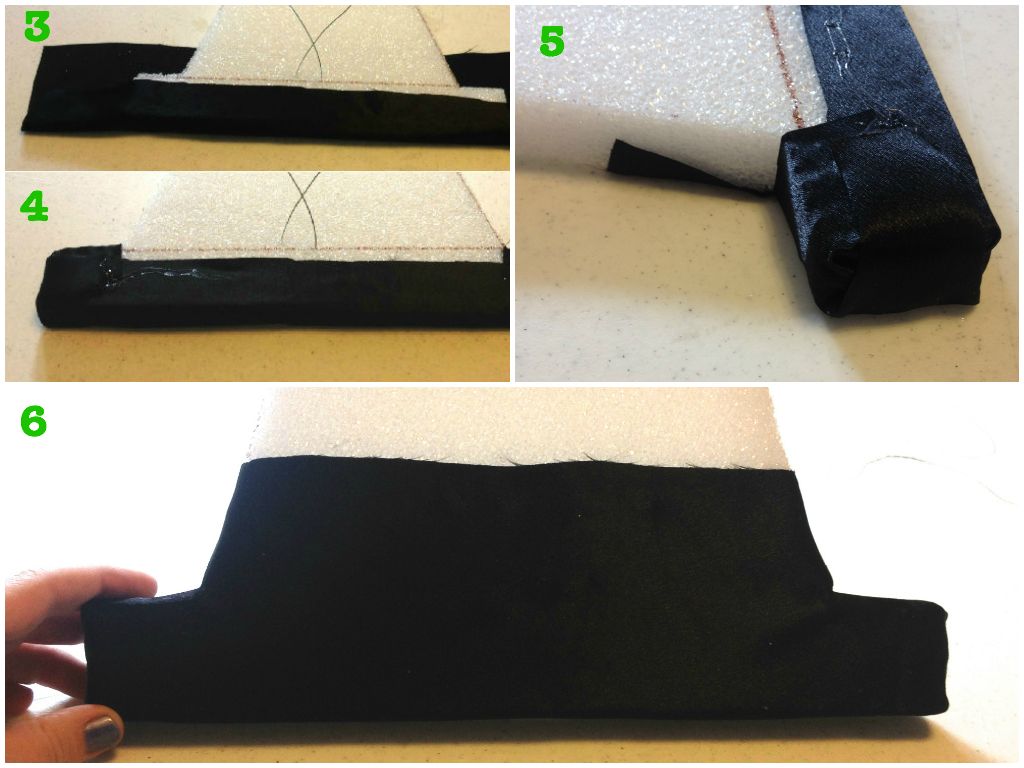
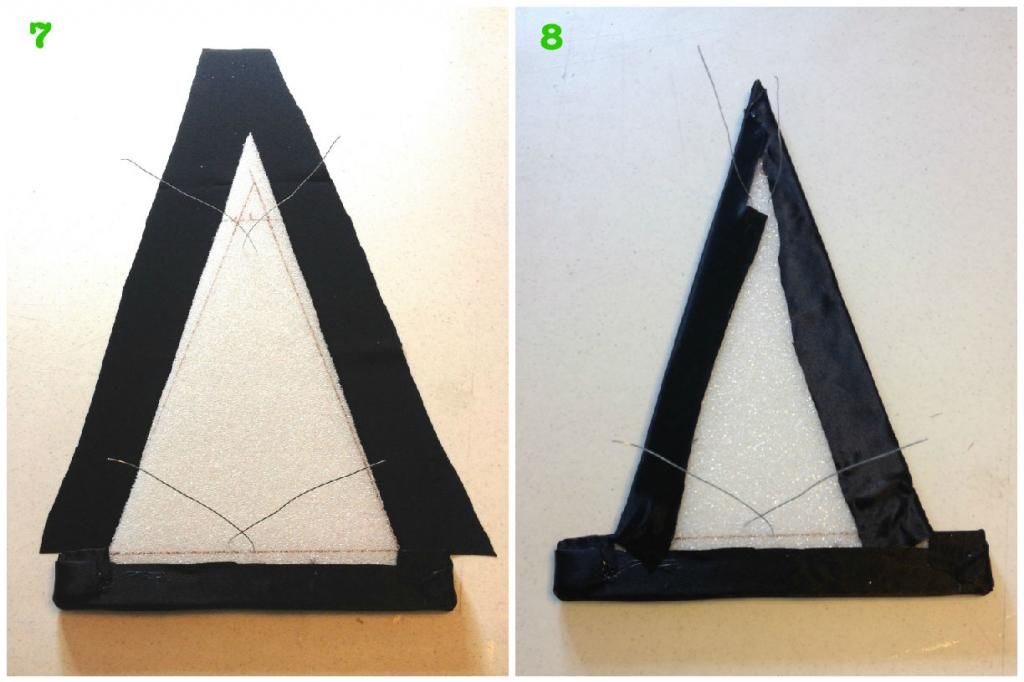
3.  Now we will cover the hat form with fabric.  You basically just wrap it like a present, using the glue gun instead of tape, but in two steps.  Do the brim first following the photos from 3 through 5.  When you are done the front should look like 6.

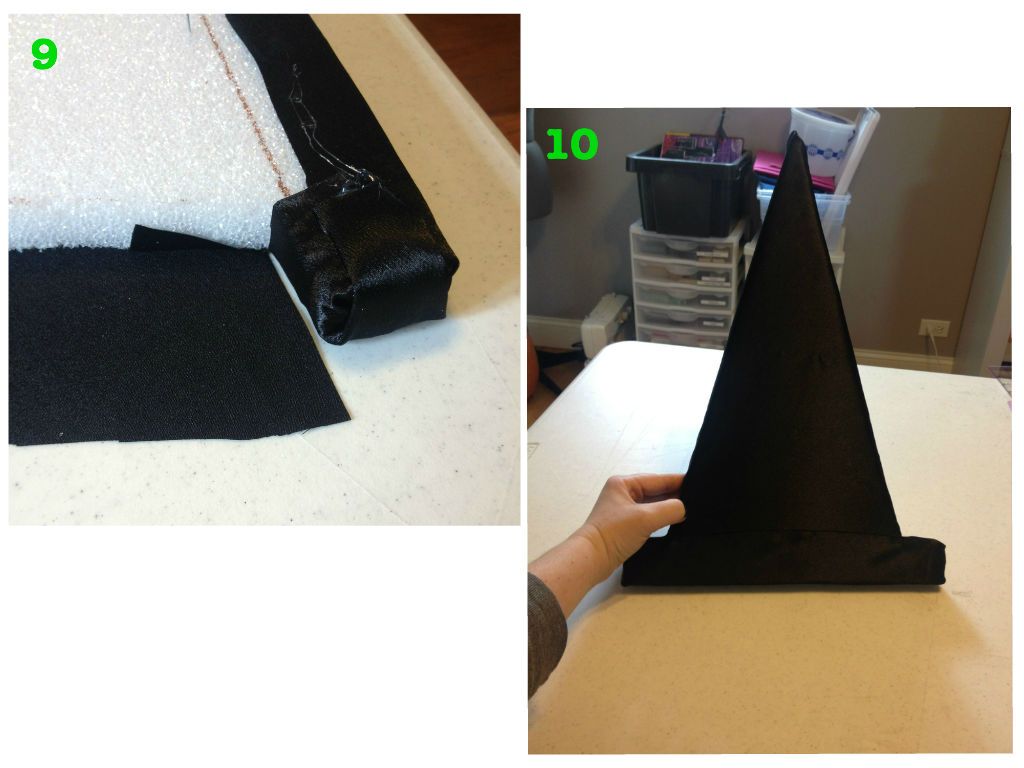
Now you will wrap the top "triangle" part in another piece, keeping all the edges wrapped around the back of the form.  There will be one raw edge on the front where you overlapped the pieces but don't worry we will cover it.

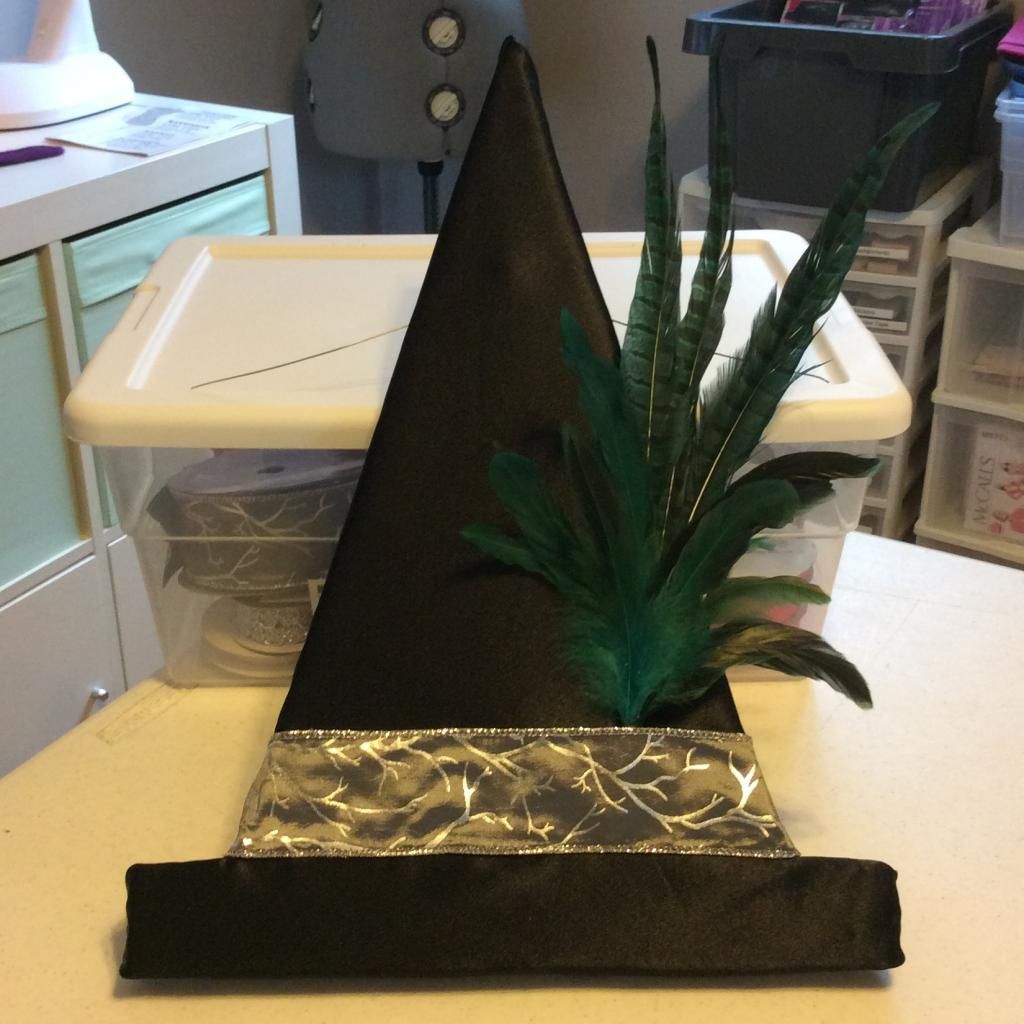
4.  Next you will add your feather spike.  I trimmed mine down with a wire cutter and glued it on right about where the band goes above the hat brim.  That way it will be covered by the ribbon.  Be generous with the glue here.  We don't want it falling off.

5.  Now you will add your ribbon hat band covering the raw edge of fabric and the glued end of your feather spike.  Wrap the ends around to the back and glue in place.

6.  This is really an optional step but I like my wreaths to look clean from the back since I can see them through the window.  Take your felt and cut it to fit over the back of your form coming about 1/4" from the edge.  I had to do this in two pieces since my hat was bigger that the felt I had on hand.  You can poke little holes into the felt for the wire to go through.  I also recommend adding a bunch of extra glue around the wire when applying the felt.  This will keep them extra secure.

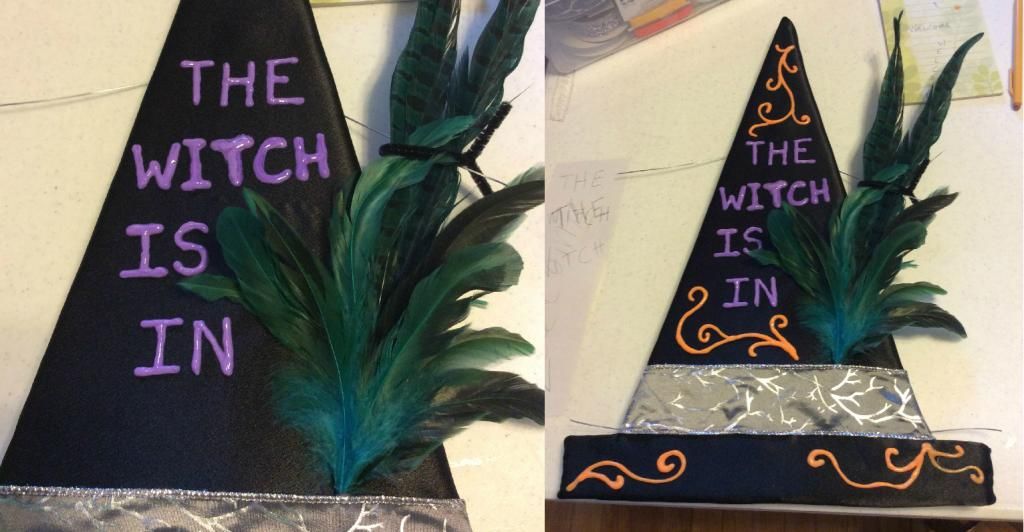
7.  Now we will break out this paints I had in the supply list to add our festive message.  If you have another way you'd like to add the letters instead have at it.  I painted the letters first and then filled in some of the blank spaces with a few swirls in a contrasting color.  Note I tied the feathers out of the way while I painted.  
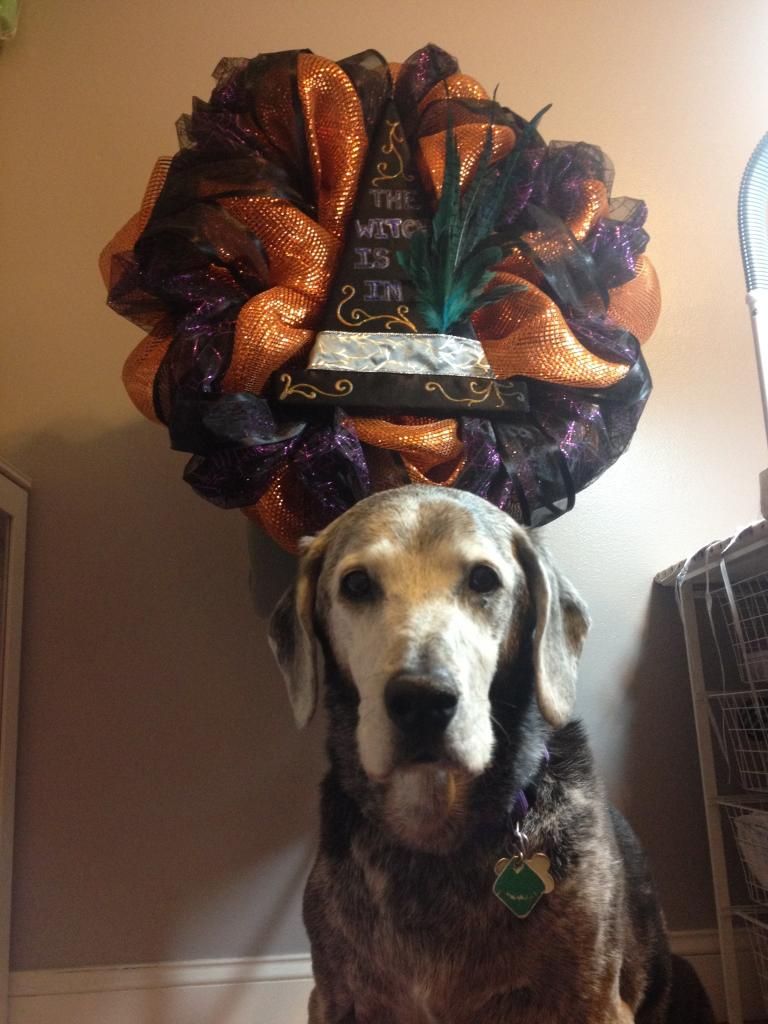
The puffy paint takes a while to dry so watch a spooky movie or do a load of scary laundry.  When it's dry just attach the hat to your wreath using the wires on the back.  

TADA!  You're done.  Now you can hang it up and just wait for the complements to roll in.  Here's Sadie in a couple dramatic poses with the finished product.


Cast on!
Anita

Saturday, March 23, 2013

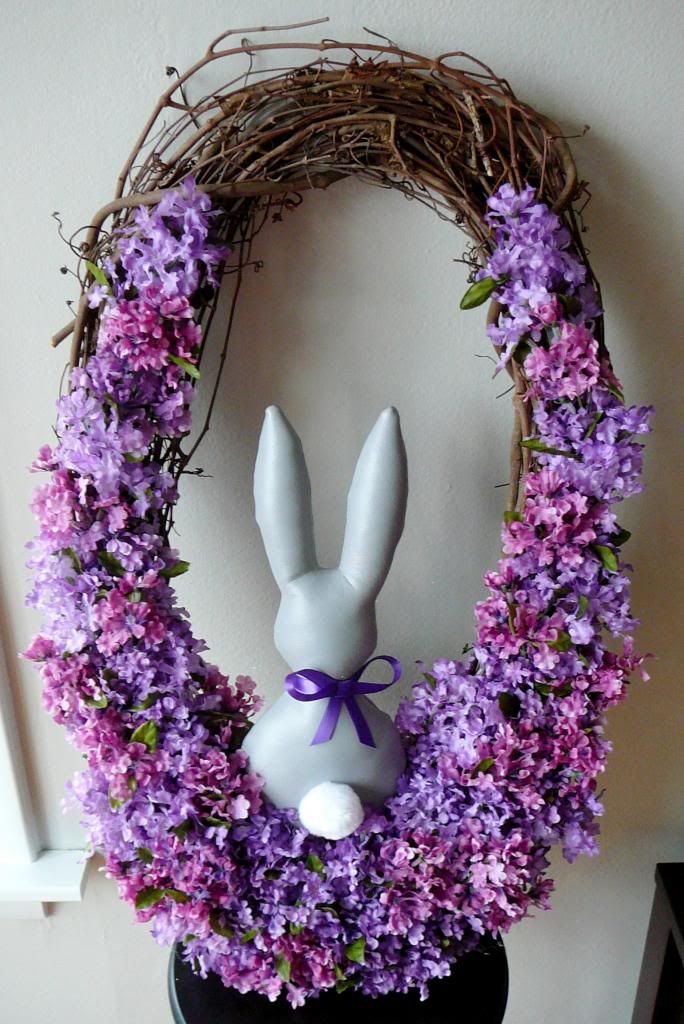
Spring Bunny Wreath Tutorial

I've had this idea in my head for over a year and didn't get to it for last Easter.  
It's also a great wreath to leave up all spring long. 

Supplies
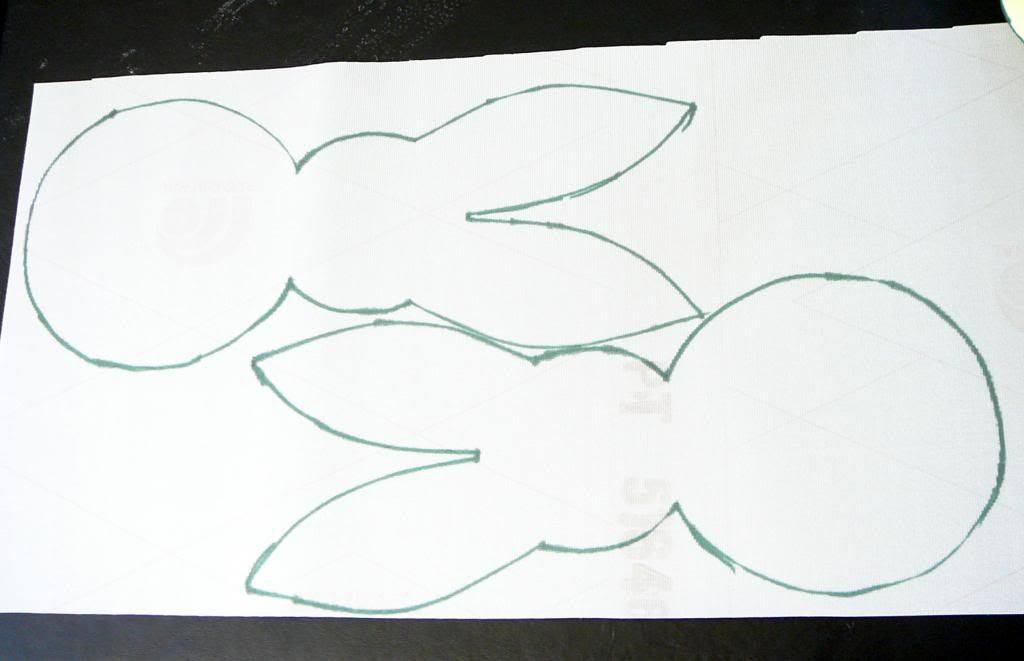
Bunny template
Oval grapevine wreath
1 wooden dowel
3 stems fake lilacs
Grey vinyl (1/3 yard is plenty)
Polyester stuffing
18" Purple ribbon
White pom pom
Glue gun with plenty of sticks

1.  Print out the bunny template and trace/cut out two from your vinyl.  The fabric that I used was labeled marine vinyl.  I opted for it since its going to be outside exposed to all the spring rain.

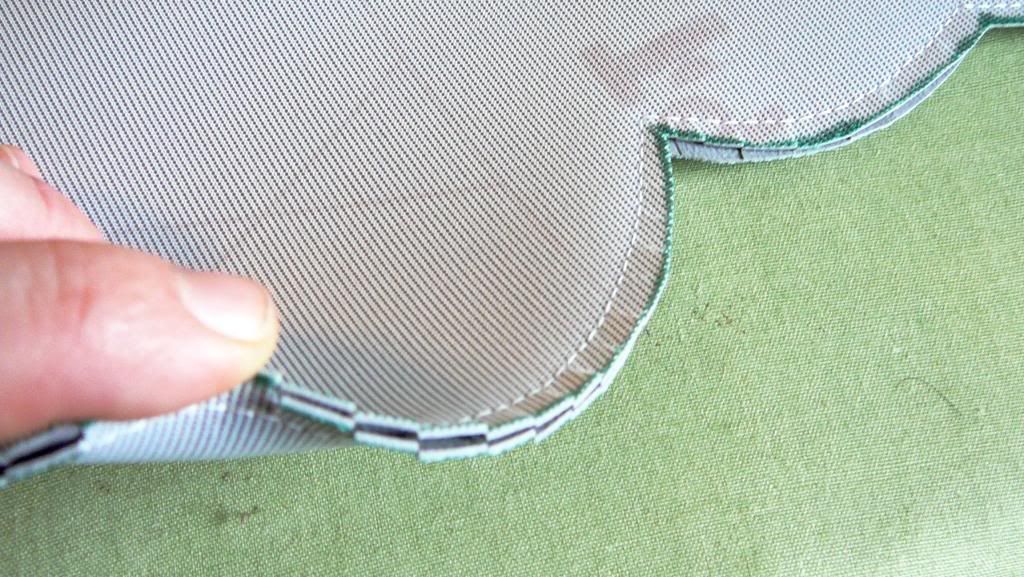
2.  Place your two bunnies right sides together and stitch around the perimeter leaving the bottom open to turn and stuff them.  But first, around all your curved seams make sure to make little snips up to the stitches.  Don't clip your seam.  This step is essential to making sure your bunny looks like a bunny. 

3.   Now we need to turn your bunny right side out.  Be forewarned this is a bit of a pain in the butt so make sure to take your time.  If you try to force it you will rip your vinyl or the stitches.  A bone folder is a very helpful tool for this step. 

4.  Now stuff your bunny with the polyester stuffing and hand stitch the bottom closed.  Don't worry about making your closure pretty cuz you won't be able to see it anyway.

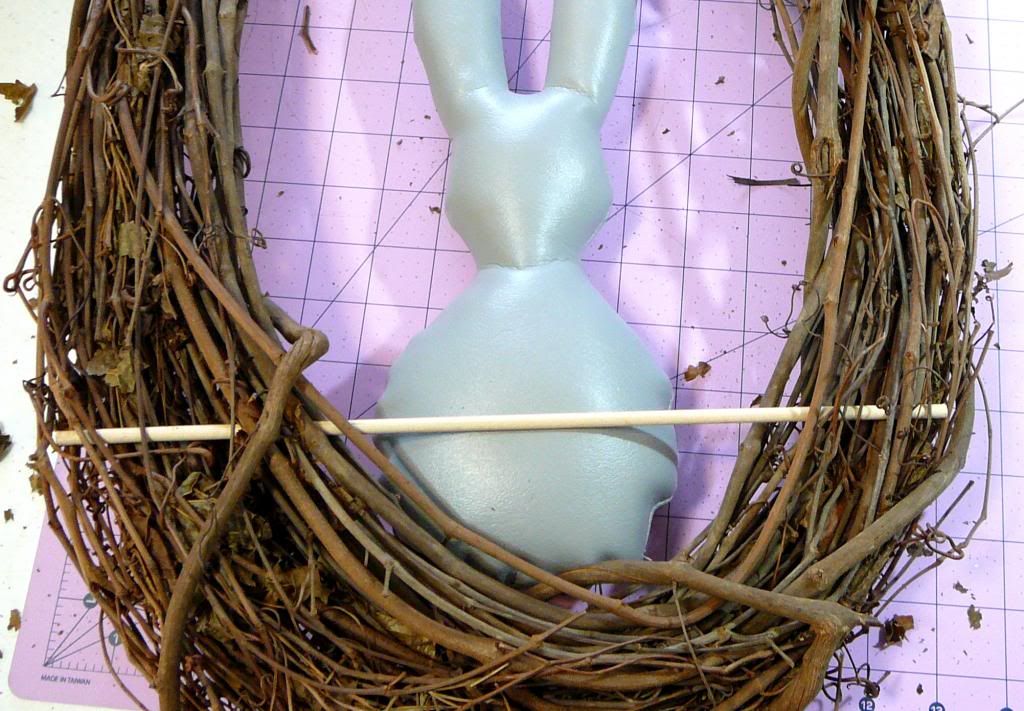
5.  Next we need to mount your bunny into the wreath.  First take your dowel and wedge it into the wreath towards the bottom and the back.  This will be a support for the back of your bunny.  Test fit your bunny in the wreath to make sure you like where you put your dowel and then glue it into place.  Now glue your bunny to the wreath and dowel.  Don't be shy with the glue. 

6. Now flip your wreath over and follow the pictures below to add a bow and tail to your bunny. 

 5.  Now for the last step, and my favorite, we are going to add the flowers.  First you will need to trim the flower clusters off the stems.  There is a wire inside the flower stem so make sure you use something that can cut through it.  I used almost all three stems of flowers to fill mine in.
 Now beginning from the top down start gluing clusters of flowers down to the base.  I tapered mine at the top and made the flowers fuller at the base.  Also make sure to use the flowers to cover up any part of the dowel that is still showing through.  

Mr. Biscuit liked the finished product so much he asked me to take his picture with it. 

Craft on!
Anita

PS I've entered the bunny wreath into CSI's weekly crafty challenge.  Go check out all the other spring wreaths for more fun & colorful inspiration!
Visit thecsiproject.com

Tuesday, October 30, 2012

Halloween Wreath

I have to sneak in this last Halloween craft before the big day tomorrow.  For July Craft Club we all got to explore our craft feelings and create a wreath that reflects our different personalities.  I took inspiration from a wreath made out of fabric and wire that required no sewing but lots of fun.  For my Halloween wreath I went with the same idea but added the twist of frugality.  A friend of mine is in a "de-cluttering phase"in her life so I took that to heart and applied that "use what you have" to my wreath.

The base of the wreath is a single circle off an old grapevine wreath.  I got the original grapevine wreath on the side of the road for free.  A neighbor had some items that they were giving away with a "free" sign in their yard.  This wreath had been loved since its creation in, I believe, the late eighties, including sporting some very faded fake birds.  The decorations may have been well past their prime but the actual grapevine wreath was ready to be born again with some inspiration and creativity.  I cut a continuous circle out of the wreath and wired the two ends together.

For the fabric I dug out all my orange, white, and black fabrics.  I had to buy some spooky holiday black fabrics to bulk up my selection for the wreath but everything was on sale so I got three new ones to use for less than three bucks total.  I cut each fabric strip one inch wide by six inches long.  I tied the strips around the grapevine wreath in the pattern 18 orange, 4 white, 18 black, 4 white, 18 orange, and so on.  The ribbon for the bow I had in my stash already from a Halloween project from two years ago.   I whipped out a quick puffy bow and wired it on and taa daa! A new Halloween wreath that cost me less that three dollars total and was completed in one Sunday evening.  I love these simple crafts that I can make with supplies I already have in my craftroom.  Now I have a Halloween wreath I can be proud of and more money in my bank account, tee hee it's a good thing.


The next project uses felt from past crafting exploits to make some gifts for Christmas.  A few bits of brightly colored felt and some glue and you have a cute craft to be given with some homebaked love.  Banana bread and trivits are my go to gift this year for a time strapped co-worker and parents of friends that are like family.  I love TRIVITS!!!!


Happy Halloween to everyone: may your crafts look their best and your candy be plentiful.

Boo,
Kelly, the origami ninja 


Tuesday, October 23, 2012

My Halloween craft insipration

All of the posts on the blog and around the intertubes has got my creative brain a thinkin.  I wanted to add to my decorations for this ultimate fun-time holiday, but money is tight in that arena so I took to the nets to see what I could find.  My first choice was based on the sweater pumpkins from the link party a few weeks ago. 
I had a few saved up sweaters from Goodwill that were burning a hole in my to-do box and this was calling their name.  I wanted to take them apart for the yarn but that was so not going to happen, either I can't take apart sweaters correctly or they talk about me and how to thwart my crafting exploits.  I think it's the latter.  So they sat in the box for three years until I saw the sweater pumpkins post at the link party and I knew what had to be done.  PUMPKINS!

I had one fuzzy forest green sweater and one fuzzy orange sweater.  The fuzzy orange one was the one I tried to deconstruct so one of the arms was annihilated.  Since the arms are what is used to make these adorable pumpkins I thought I was going to miss out but my craft muse smiled on me, she is so nice to me sometimes, and that fuzzy sweater gave me a short fat cowl to make into a cute little squat pumpkin.  I added some fun fabric stems and a bit of cotton string for my pumpkin necks and Houston we have decorations. I have these guys on my mantle, on my little decoration table in the hall, and on my kitchen table.  So cute!
 
I hope everybody is looking forward to tricks-or-treats coming up next week, I know I am!!!!
Let us know what you are up to with your crafting genes.
 
Kelly, the jack-o-lantern ninja


Wednesday, June 27, 2012

June Craft Club....... circles of patriotism

Wow!!! Anita's last post about the orchids was so pictorally wonderful.  All the color and texture  was fantastic to look at and enjoy.  I love how complex the plants look but the beauty they express seems so simplistic it calms the soul.  Nicley done Anita.  So to follow in her footsteps I plan on adding lots of pictures to my post too.  While mine are not as natural they are colorful and fun!


For this months Craft Club we got ready for the upcoming celebration of Red, White, Blue with some great wreaths.  The truly cool part of this whole event, other than the BBQ at the end, is that each of us picked a different wreath to make so we had no overlap.  I like the different styles we have, it makes Craft Club more fun!


I am not quite sure Mr. B was all that excited to be involved in this project.
We had lots of yarn used, felt cut, and fabric sliced into a great collection of circular homage to our great country. 


Each of these cute wreaths really matches our personallity to a tee.  We have fun and flirty, country Americana, classy and chic, and eye poppingly adorable.


Now lets get to the good part of the finished works.  We even had everybody complete their craft that night, very unusual. Way to go ladies!


Laura's yarn wrapped life saver with those super cute stars!


Katy's luxurious rosettes, very chic.


 Kelly's farm girl fabric knots.


 Anita's rolicking rockets of color.


Like I mentioned earlier, after all the crafting we got hungry so we had grilled chicken, corn, salad, homemade bread, and cupcakes for dinner.  Anita and Laura even made real lemonade while Katy and I grilled, ok Katy grilled I chatted.  Very tasty indeed!

I hope you are having all kinds of American inspiration this month.  The Fourth of July is almost upon us so make sure to bring out your patriotism and show it to all.

Keeping it USA,
Kelly, the origami ninja


Friday, October 21, 2011

HTTC - Skeleton Wreath


OK I’m in love with Halloween and swore last year that I was going to do the house up big so all the kids in the neighborhood would come trick or treating at my door.  I’ve been doing pretty good, with the final touches going up this weekend, but my door looked pretty bare.  I decided to add a Halloween wreath but one that wouldn’t be too creepy to scare the super little trick or treaters I hope to get more of this year.  Here’s what you’ll need.

Supplies
Felt 
White - 3 sheets 
Purple - 2 sheets
Neon Green - 1 sheet
Dark grey - 1/2 yard (I bought this off the bolt since it needed to be wider than the felt sheets you get from the craft isle.  It was on sale at Joann for 2.75 a yard.)  
Grapevine wreath (any color)
Black spray paint
Black embroidery floss and needle
1 piece of white tissue paper (like for stuffing gift bags)
Glue gun with plenty of glue sticks
Scissors
Pruning snips(optional)


1.  First you’ll need to spray paint your grapevine wreath black.  This takes a couple passes because of all the nooks and crannies.  Do this first so you can go back and add coats or let it dry while assembling the rest of the wreath.

2.  To print out the skeleton template click here and download the file.  Feel free to resize the template if you have a larger or smaller wreath.  This guy fit nicely in my wreath that has a 11.5” opening.

3.  Go ahead and cut out all the individual paper pieces and plug in your glue gun so its ready to go.


4.  Pin each of the skeleton parts to your felt making sure you have enough room to cut out 2 of each skull, jaw, shoulder/collar bone and ribcage and arm bones.  
Trace your templates onto the felt and cut them all out.

5.  Now we are going to hot glue the like pieces together.  So line up one felt ribcage on top of the other, lining up the edges and glue them to each other.  You are basically doubling the thickness of each template piece.  Repeat with all the other pieces but make sure you don’t add glue where your teeth are going to be.  Trust me on this one.  You should end up with two arms and one of everything else.

6.  Watch the video to learn how to sew the teeth gaps onto the skull and jaw bones.

7.  Take your tissue paper and place it under your dry wreath.  Now trace a circle around the inside opening of the wreath.  This will help you line up your skeleton so you know he will fit inside your wreath.

8.  Measure the diameter of your wreath from outside edge to outside edge.  Now cut two squares from your dark grey fabric with all four sides in that length.

9.  Take one of your dark grey felt squares and start laying out your skeleton on it the way you want it to look on the inside of your wreath.  Feel free to cut the neck down as I made it long on purpose for this adjustment step.  Periodically place your tissue paper template on top to make sure he will fit how you want.

10.  When you’re happy with your skeleton layout glue down all the pieces.  Use liberal amounts of glue as it will help stiffen your felt and make it more stable on the inside of your wreath.
Now trim the grey felt around your skeleton leaving a border.  Mine was about 1/2” all the way around.  Don’t forget to leave tabs at the top of his head, ends of arms and bottom of ribcage so we can attach him to the wreath later.  

11.  I wanted an added layer of the grey felt to reinforce and stiffen my skeleton more so glue your skeleton down on top of the other piece of dark grey felt.  Once again be liberal with your glue.  This time I left another border but it was only 1/4”.   You can see all four layers below.

12.  Here’s where we are going to cut out your happy halloween letters.  I just free hand drew the letters but if you’re not comfortable doing that just print out some in block lettering that you like.  I drew mine on a piece of scrap paper and then went over it with a black sharpie.  This is so your letters will show through to the other side of the paper.  (I always like to trace things on the back so if I make a mistake I don’t ruin a whole piece of felt.)  This way all your letters are already backwards and ready to be used as a reference.

13.  Now take your green felt and cut out 14 squares measuring 2” X 1.75”.  I make squares first so I know all my letters will be the same height.  Now draw your backwards letters onto each of the green blocks, making sure the vertical edge is 2” long, and cut them out.

14.  Glue your green letters down onto one of your purple felt sheets, leaving room in between letters, again being liberal with the glue.

15.  Now cut them out, leaving a 1/4” border of purple around the green.  Just like the skeleton I repeated this process with the other piece of purple felt for added rigidity and support, but I didn’t add another border the second time around.  Here’s what you felt letter sandwiches should look like.

16.  Cut out two small circles from scraps of your green felt and glue them down for the skeleton’s pupils.

17.  Next we will glue your letters down to the grapevine wreath.  I always like to start words in the middle so I know they won’t end up lopsided.  That means the 1st P in happy and the O in halloween will line up in the middle of the wreath.  Its also helpful to prop up your wreath so you can see things better.

18.  Last step is to glue your skeleton to the back of your wreath attaching it with glue at the tabs you left on the edges.  Make sure you use lots of glue.  We don’t want your skeleton falling off in a light breeze.


TADA!  Now you have a fun, festive and friendly door decoration to add to your halloween arsenal.  The bright colored felt was a plus too cuz you can read it from farther away.  
Happy Halloween!  
Craft on!
Anita