Showing posts with label sadie. Show all posts
Wednesday, February 24, 2016
An immeasurable loss...
It's taken me a while to write this post. I knew it was coming a while ago and have dreaded it. We said goodbye to my closest and dearest friend, Sadie, last month. There are no words that can explain the loss we feel but I'm so grateful she was able to meet my son before crossing to the rainbow bridge. I met Sadie when she was only 10 weeks old in a dingy Missouri kill shelter. I always said she was the best $25 dollar investment I ever made as that was the total of her adoption fee. She lived with me in 5 states and was by my side through countless adventures. I love all my dogs but this was one of those once in a lifetime friendships. I wouldn't be the woman I am today without having her with me for the last 15 and a half years teaching me patience, strength and immeasurable love. She will always be in my heart.
Wednesday, October 7, 2015
HTTC : Costumed Canines - Dr. Sadie Frankenstein
You will see a pattern for my dogs in this years costumed canine parade through the Howl-oween Tricks or Treats Craftathon. Just wait until you see what the mad Dr. Sadie has created later this month.
Howl on!
Anita
Friday, June 5, 2015
Happy Birthday, Sadie!
Our senior pack member turned 15 today! Sadie celebrated with lots of naps, barking at some dogs in the far off distance, and a little slice of puppy birthday cake. Oh how the last 15 years have been the greatest because of this dog. We love you, old lady.
Sunday, February 15, 2015
Homemade Sausage Party!
In keeping with the "from scratch trend" I've been on, I got the crazy idea that I wanted to try to make some of my own sausage last year. Now in the list of ideas that I get on an almost daily basis this one didn't seem like something very viable until we were making Christmas lists for family. I've had an attachment for my KitchenAid mixer to grind meat for some time(unused and still in the box, of course) and I found out there is another to stuff sausage, so that was on my list. I also looked around on Amazon for a highly rated sausage cookbook and found Bruce Aidells's Complete Sausage Book, which I also added to my list. Through the miracle of Christmas I found myself the owner of both these items. Next was to open some adult beverage and try them out.
A couple weeks ago a my friend Nick came over to test run some recipes from the book along with some fun toys including this crazy huge grinder/stuffer that he bought a while back. The grinder made quick work of the chicken and pork meat we had for grinding. (It kinda reminded me of play dough to be honest.)
I had chosen 3 recipes that I wanted to try which included fresh kielbasa, breakfast sausage, and chicken apple sausage and Nick brought a pre-made spice mixture for bratwurst. The grinding and mixing was definitely the easy part of the process. Stuffing the casing was more of a challenge. Nick brought a collagen casing for us to try and I had bought some natural casing from a local butcher, which we didn't even get to. Katy crashed the party to help out and fired up the George Foreman so we could taste our handmade meaty goodness. Honestly I would need a ton of practice to stuff on my own cuz it took two to three of us to do it smoothly. I was stuffing meat down the shoot and Nick was holding the casing onto the end of the stuffer with Katy at times helping us coil it up into a neat spiral.
Trying to understand how full to stuff the casing is the hardest part cuz too full and they split the casing, not full enough and they didn't look like sausage. We also had some air bubbles appear along the sides which we promptly eliminated with a sharp pin. Remember that none of us had experience with this process and reading of directions/instructions was minimal so I'm sure we weren't doing it properly. It was a learning process.
After our planned four recipes Nick made an improvised sausage from the supplies we had left to finish up the meat which turned out quite tasty. We all agreed that the pre-made spice mixture we used for the bratwurst wasn't a strong enough flavor when following the directions on the package but all the recipes from my cookbook were amazing! There was a lot of tasting, by humans and dogs alike. Gidget told me afterward that she thinks that's what doggie heaven is like.
I froze them in six packs wrapped in foil and we've eaten about half our share of the day's work already. That can only mean I'll have to plan another sausage event for spring. Anyone interested?
Link on!
Anita
Monday, December 22, 2014
The Evil Ornament Challenge Part 2
If you read Kelly's last post you'll know a little about the title of this post. I bought about six of these 4 packs of glass ornaments after Christmas from the clearance bin a couple years ago. Yep I said years. They were a deal too good to pass up being only .99 for a four pack theater was originally 3.99. They have been taking up valuable storage space in the craft room ever since. As Kelly mentioned I recently moved the craft room to the first floor of our house(reveal post coming soon) and decided to purge them in the best way I know how....a Crafty Challenge! The only rule was that you have to make 4 different ornaments, medium was up to the crafter.
I'm all about glitter this year so I knew it would play a part of at least a couple of my ornaments. Here is instructions on how to apply the glitter to the inside of the ornament. Other than that I winged it the whole way. Here's what I came up with.
In true Anita's-fashion I couldn't just stop at the assigned 4 ornaments. There were two additional rogue ornaments in the storage bin so I decided to do something with them as well. So here's the run down of what I did with each one.
I took inspiration from a Santa ornament somewhere on the net for this one. Inside was coated in fine red glitter and suit elements were made from ribbon. A classic look.
This was the easiest of all six. I coated the inside with blue glitter and stuck on rhinestone paw print stickers to all four sides. That's it!
In contrast this was the ornament that took the longest. I sifted through my button jar and found enough festive red buttons to plaster the exterior of my if my blanks. This was a little like putting together a jig saw puzzle. After all the buttons were hot glued in place I filled it with fake snow to make it look so much nicer.
Then there's the polka dot glitter ornament. For the remaining ornaments I painted the outside with glass specific paint, baked them according to the bottle instructions and then filled the interior, I felt it needed a little something extra so then came the bow. This one may become a gift.
The snowmen were pretty easy aside from using a super tiny brush to paint their features. The hubby even picked out the glitter color from my stash because I couldn't decide. GREAT CHOICE!
And then there is my favorite. I painted on this woodland cabin scene and then coated the inside with a dark blue glitter. Its like a twinkly star christmas night. Really proud of this one.
Nice try, adorable old dog.
Craft on!
Anita
Saturday, October 18, 2014
HTTC - Witchy Wreath Part 2
Part 2 of this tutorial basically consists of making the witch hat form in the middle. You could use this technique to make a center form for any holiday decor.
Supplies
Deco mesh wreath from part 1
Craft Styrofoam board - mine was I got it at Joann in the styrofoam/wreath area.
Black fabric - I chose a polyester cuz it will be outside.
Black craft felt sheets - 2 pieces
Ribbon - 20" piece for hat band
Feather spike - Also in wreath section
Puffy Paint - 2 colors
Small gauge wire - 2 pieces, 12" each
Pipe cleaners - use the same color as in the part 1 tutorial
Glue gun and sticks
Scissors
Box cutter or something to cut the foam
*I've numbered a lot of the photos and they will be notated in each step with a colored number.*
1. First you will need to cut your hat shape from the foam. I drew a 1.5" X 12" rectangle for the brim and then a tall triangle on top.(1) Now use your box cutter/blade to cut it out.(2) EASY!
2. Next we will insert your two pieces of wire through the foam. Bend the wire in half will a squared off edge like in the picture. You can just push the wire through the foam till the squared edge is flush with the surface. I put one towards the top and another closer to the base.
3. Now we will cover the hat form with fabric. You basically just wrap it like a present, using the glue gun instead of tape, but in two steps. Do the brim first following the photos from 3 through 5. When you are done the front should look like 6.
Now you will wrap the top "triangle" part in another piece, keeping all the edges wrapped around the back of the form. There will be one raw edge on the front where you overlapped the pieces but don't worry we will cover it.
4. Next you will add your feather spike. I trimmed mine down with a wire cutter and glued it on right about where the band goes above the hat brim. That way it will be covered by the ribbon. Be generous with the glue here. We don't want it falling off.
5. Now you will add your ribbon hat band covering the raw edge of fabric and the glued end of your feather spike. Wrap the ends around to the back and glue in place.
6. This is really an optional step but I like my wreaths to look clean from the back since I can see them through the window. Take your felt and cut it to fit over the back of your form coming about 1/4" from the edge. I had to do this in two pieces since my hat was bigger that the felt I had on hand. You can poke little holes into the felt for the wire to go through. I also recommend adding a bunch of extra glue around the wire when applying the felt. This will keep them extra secure.
7. Now we will break out this paints I had in the supply list to add our festive message. If you have another way you'd like to add the letters instead have at it. I painted the letters first and then filled in some of the blank spaces with a few swirls in a contrasting color. Note I tied the feathers out of the way while I painted.
The puffy paint takes a while to dry so watch a spooky movie or do a load of scary laundry. When it's dry just attach the hat to your wreath using the wires on the back.
TADA! You're done. Now you can hang it up and just wait for the complements to roll in. Here's Sadie in a couple dramatic poses with the finished product.
Cast on!
Anita
Saturday, October 4, 2014
Costumed Canines - The Silver Sade
The Silver Sade
Super Powers - Too many to list but a couple are her gift to influence the minds of other super hero dogs to keep them in line, and her infinite memory because she has been alive for as long as time itself.
Kryptonite - Squirrels. She will drop everything to chase one.
Saturday, May 10, 2014
Fab or Flop: Weekend in Stockholm Afghan
So how did it go? Not too bad. I think I could have done better with the finished scalloped edge but being that this is my first full fledged afghan I'm pretty happy. I have also gone through a bit of a roller coaster with the color selection. From love, to unease, to dislike, to disappointment, back to love. This all happened as the blanket was assembled. I had no worries until that step. Somehow, though, once I completed the boarder and stepped back, all my love for the original idea returned. I especially love the yarn I chose, Caron Simply Soft, which I got at Joann of course.
Like I said this project was started last year and was sitting in a bag in the craft room. I had all but maybe 8 squares done when I gave up. How silly am I. I was on the downhill slide to the finish and couldn't see it. I had a three day weekend from work this last week and it was rain central around here so what did I do? Curled up in the lazyboy, with both little dogs in my lap of course, and pounded out the finished product. I was surprised at how quickly the joining process went. I mainly listened to an audio book as I went along but one day I even just sat in the quiet. (I have become a lover of quiet lately.) Nature provided a soundtrack that day with the rain an thunder. Way better than any recording.
![]() |
When the sun finally came out. |
I'd say the planning and patience to make it to the end were the toughest parts of this project. The pattern itself looks much more challenging than it is. After a few squares I got into a rhythm that was easy to maintain. Plus it's alot of treble crochet so the squares grow quickly. This is definitely a pattern that I would recommend to someone who has a little crochet experience but you don't even need to be a novice.
Tiny diva Gidget totally crashed my final photo shoot. This was the best shot because she was doing it in protest. The only thing she would tell me was that she disapproved of the lighting.
All in all I would say this is a FAB, but long, pin. A keeper in the afghan library.
Crochet on!
Anita
Labels:
crochet,
Mr. Biscuit,
Pinterest Fab or Flop,
sadie
Saturday, March 22, 2014
Puppy Nesting Boxes
Well I finally finished a project that seemed to take forever. This all started, as most of my crazy ideas do, from a simple need. I needed a new thread catcher for my sewing table. My old one got requisitioned to be a pen holder on my desk. I've had this pattern for quilted nesting boxes from SewMamaSew for a long time. The little one looked perfect for my needs but I thought I should make a couple since it would be handy on craft days when we have multiple girls sewing at a time, and who really doesn't need an extra container or two. So then the idea grew into three boxes. Well if I'm going to make three of something it of course needs to be customized to each of my three dogs at home. Enter the puppy nesting boxes.
The size choices were easy since we already call our dogs small, medium and large to begin with. (Gidget is actually called Tiny Bits but small will suffice for a nesting box.) Color choices were pretty easy too since I just went with what color their collars are. I simplified the pattern a little since I didn't quilt the boxes but assembling their faces and body markings took a little planning. I also free hand embroidered each of their names on the back with thread to match the color of the lining. (Sorry about the blurry picture.)
Here's each of the pooches with their respective box.
Gidget
Mr. Biscuit
Sadie
You may have noticed I did a younger version of the girls.
They both said to keep the gray face to a minimum.
They stack together great for storage in case I'm not using them.
Have you ever altered a pattern that turned out better than you expected? Tell us about it in the comments.
Sew on!
Anita
Saturday, October 12, 2013
HTTC - Howliday Dogs - Sadie Spectre
Sadie is totally in the mood for a haunting good time and she's bringing some doggie flavor to a classic old school costume. There's something really comforting about cutting holes in a sheet and making your dog wear it.
Haunt on!
Anita
HTTC - Gone Batty Necklace
I got inspired from some other glue projects I've seen popping up on pinterest. I have to say this is one of the easiest Halloween projects I've done and definitely the easiest I've created. You could easily make this into any type of necklace like a ghost, cat, pumpkin....the possibilities are endless.
Supplies
High temp glue gun (you could try this with a low temp but I'm not sure it would work as well.)
Glue sticks
Silacone baking mat (you'll need one that is relatively see-through like a Silpat)
Black or grey spray paint
Rhinestones (2 of same color)
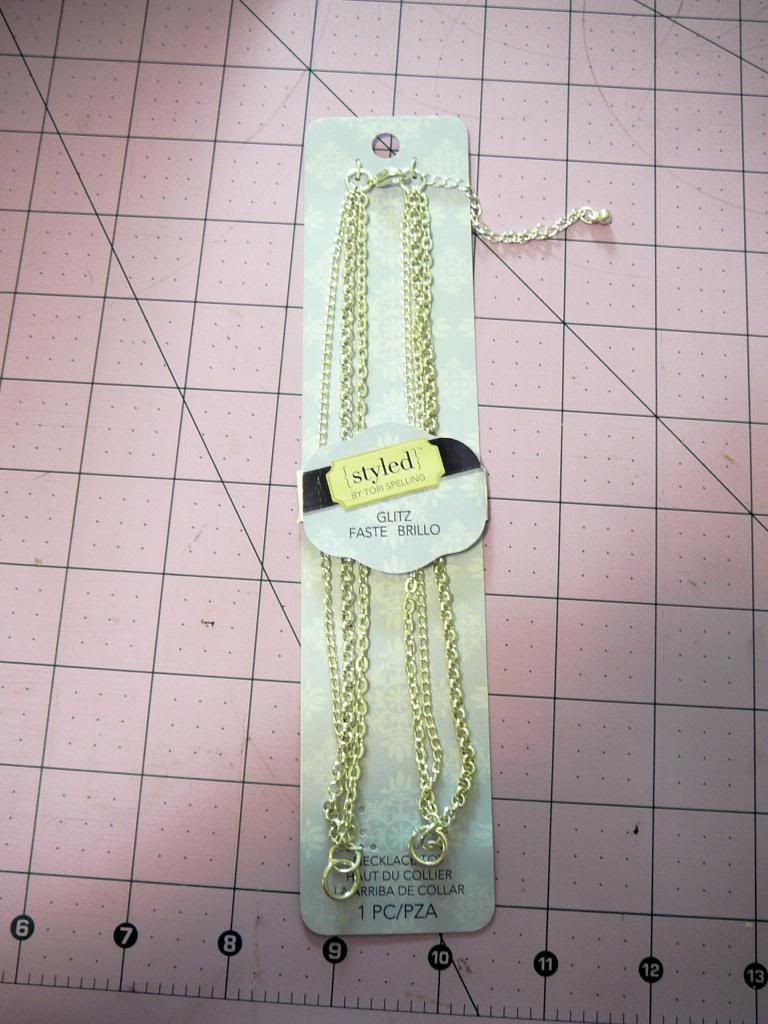
Necklace chain (I got mine at Joann's. It is from Tori Spellings craft line and I love it. There's a picture of it in step 7.)
2 Small jewelry eye pins (available at your local craft store)
Black craft paint and small brush
NOTE* Make sure to do this project in a well ventilated area. Nobody needs to be sucking in glue fumes for the sake of Halloween.
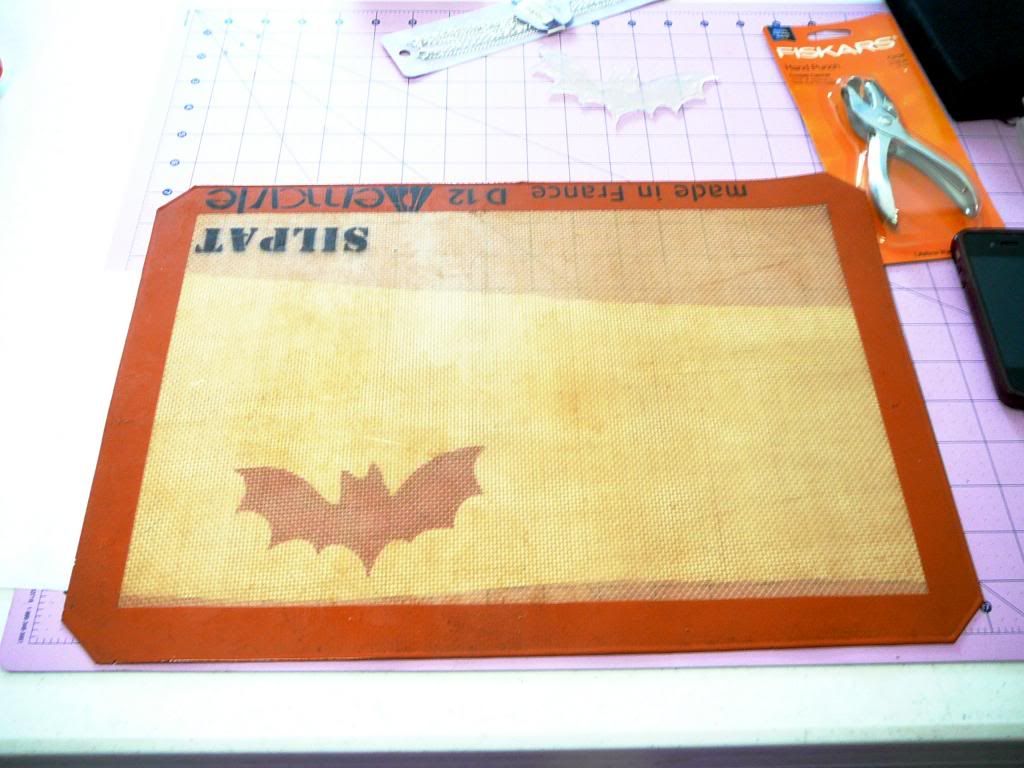
1. First you'll need to create your template. I just drew this bat myself but you can easily just use a clip art image. Just make sure it's a relatively simple drawing. Details are hard to master with the glue. I also was able to see it better when I colored it in with the marker instead of just an outline. My drawing was 5 inches wide by 2.5 inches high in case you need a size.
Before step two make sure your furry sidekick is close at hand for any assistance you may need. Gidget was standing by through this whole crafty experience. What a great partner.
2. Place your template under the silacone mat.
Now you are going to trace around the outside edge of the template with the glue. I used the high temp glue so that I had a longer window to work with the glue before it dried. CAUTION! Do not touch the tip of your glue gun to the silacone mat. You could damage/melt the mat if you do.
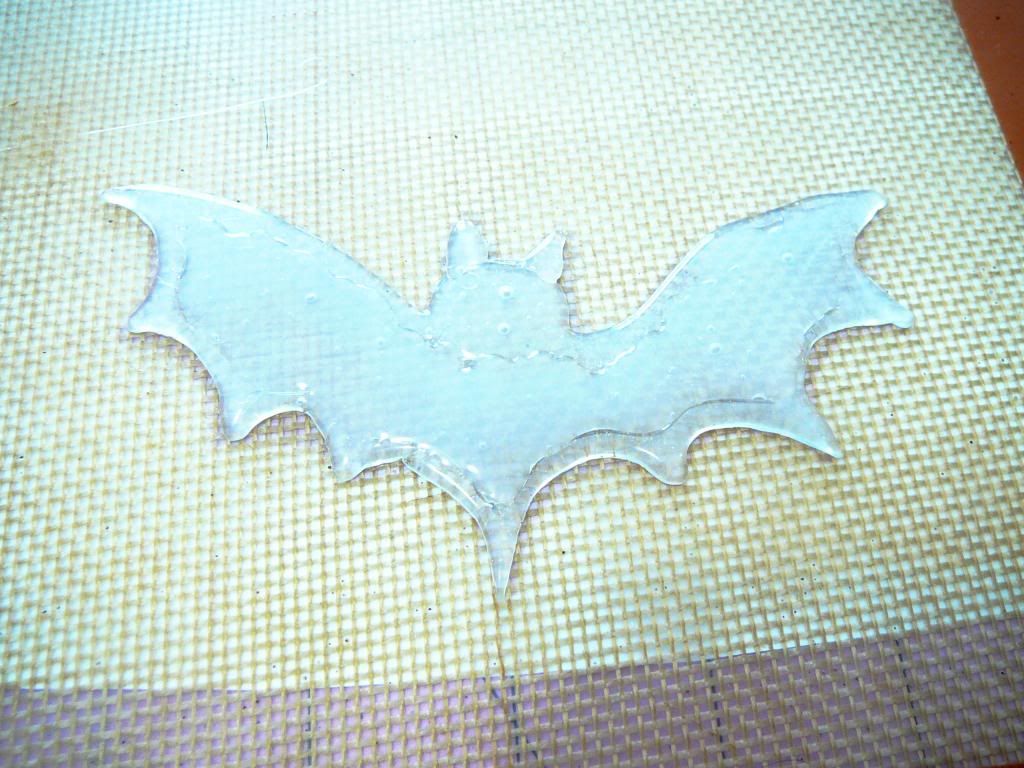
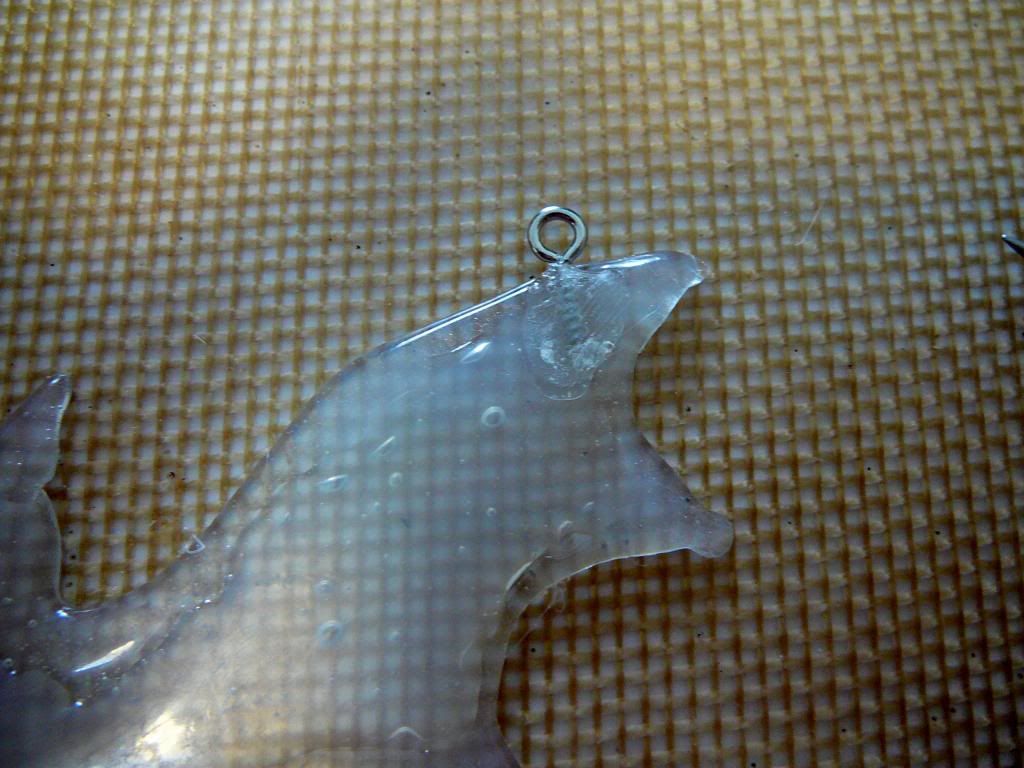
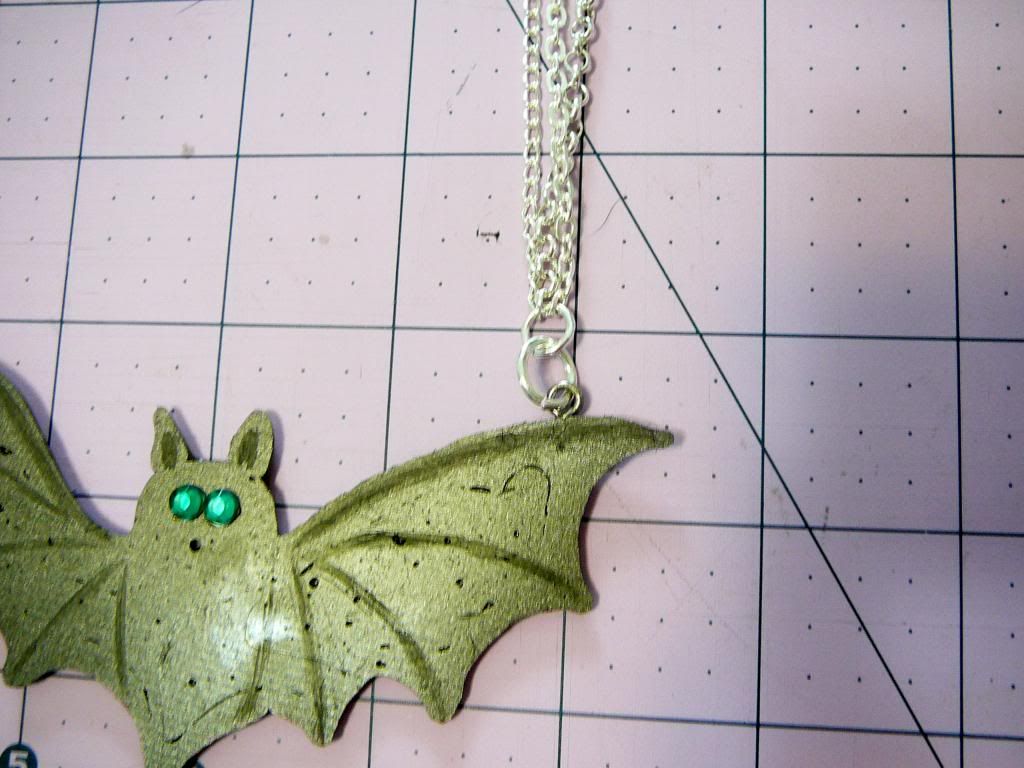
3. After you've traced around the outline I pealed the it off the mat and cut off any stray glue strings. Don't worry it will stick right back down to the mat. Now go back and fill in the bat with more glue. Make sure to get right up next to the outline and like the above step it's best if you can do this while the outline is still liquid. Now just let it dry. When you peal it off the mat the side that was down will be the front for your pendant. It has a nice even flat appearance. Here's what the filled in bat should look like.
4. One more glue step before these really start looking like bats. You'll need to glue on your eye pins. On the back side of your pendant you can just add a dab of hot glue for each and stick them in. I actually used the tip of the glue gun to melt back into the pendant before adding a small amount of glue so they were sunken below the surface.
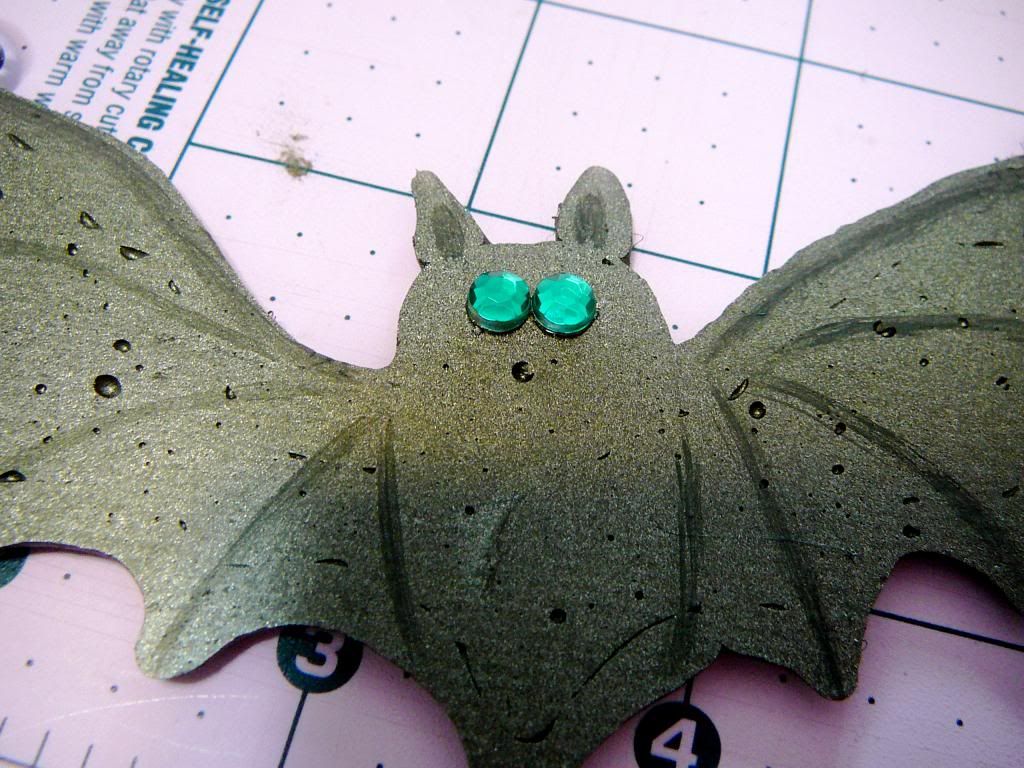
5. Now take your glue bat outside and spraypaint both sides with your chosen color of paint. Let dry. I love how you can see some of the irregularities in the glue surface after you paint it. I think it makes it look old and creepy. I also used a little bit of black craft paint to add some details to the wings.
6. Now glue on the rhinestone eyes. I used hot glue again and a pair of tweezers to keep from burning myself.
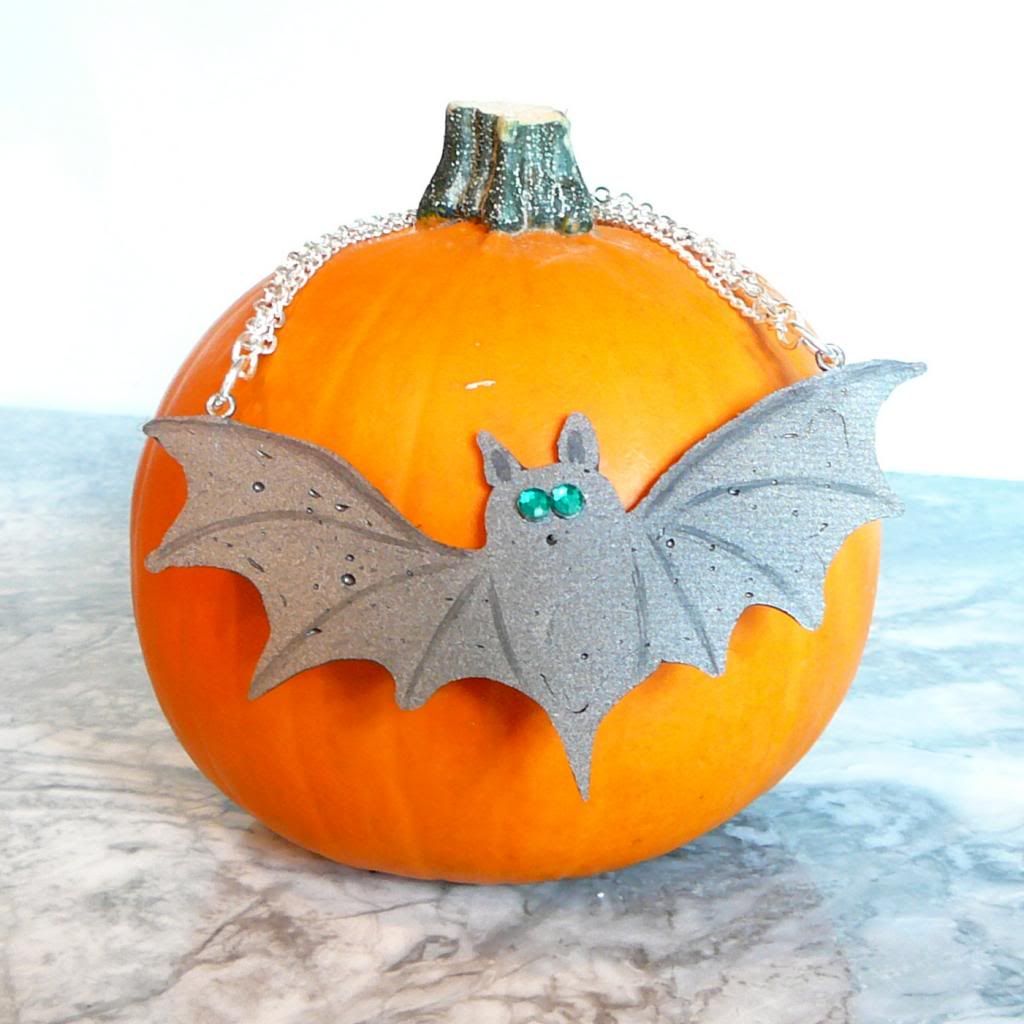
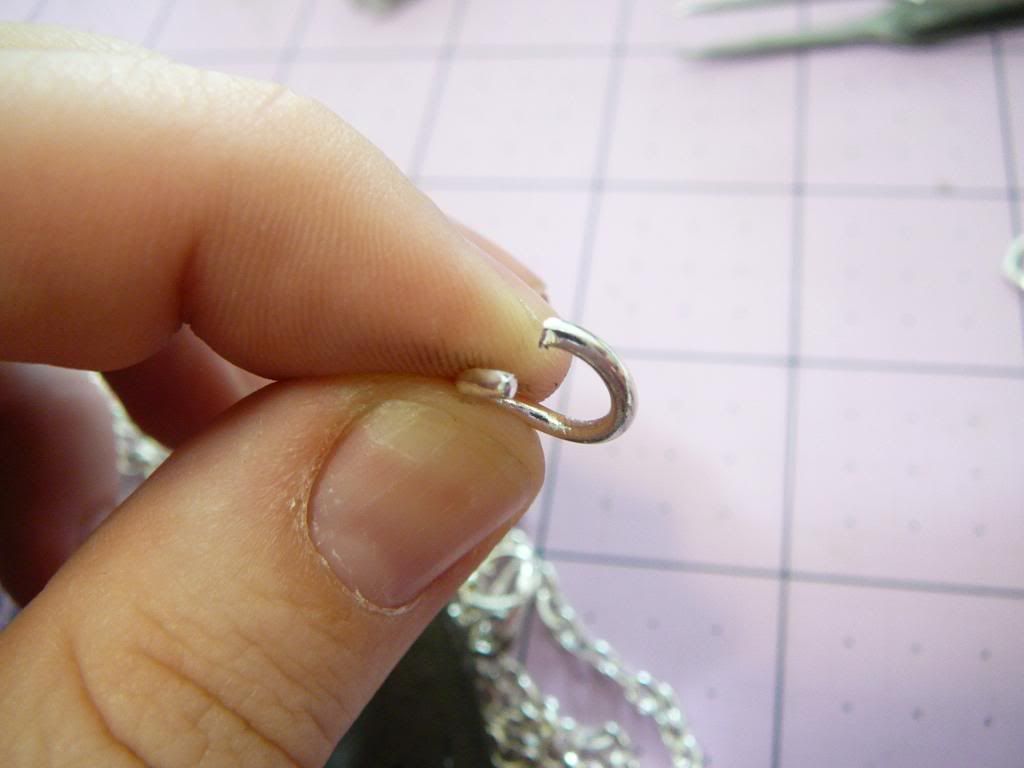
7. Last step! Take your pendant and attach it to your necklace chain.
I just opened the jump rings at either end with a couple pairs of pliers and hooked them onto the eye pins in my pendant.
Click here for a great post on using jump rings with tons of pictures. You could also use a piece of string or cord and just run it through the eye pins but I think this looks way nicer.
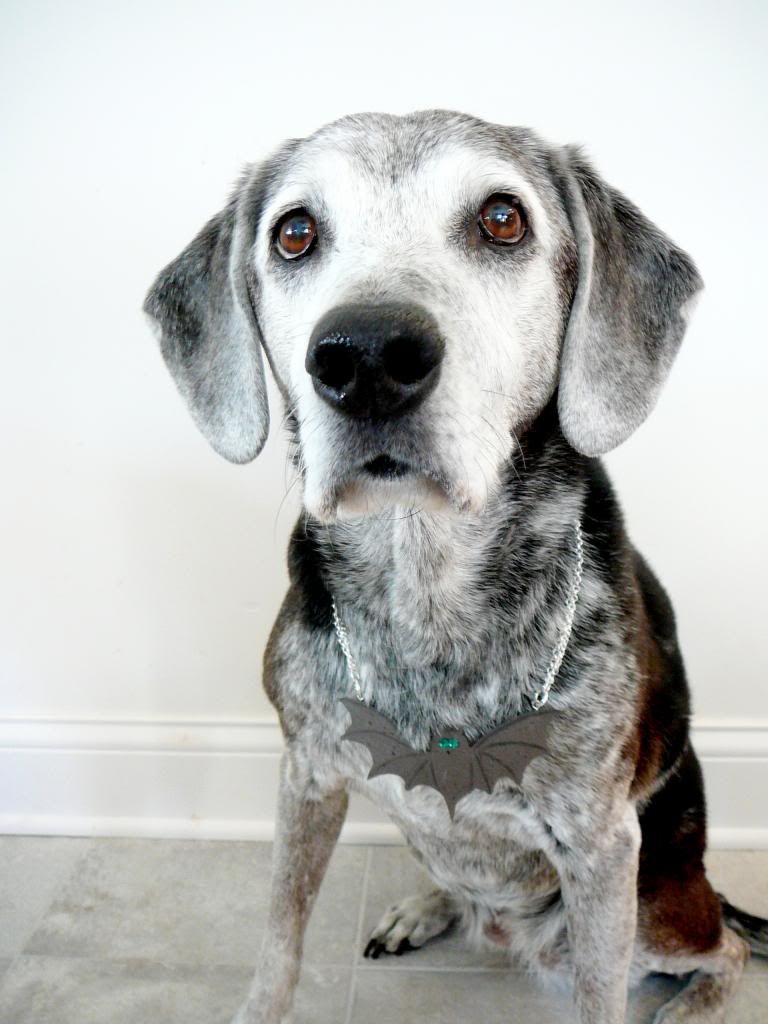
TADA! You're batty necklace is ready to accessorize your fave Halloween costume or outfit. Sadie liked mine so much she asked to wear it for the whole day.
Craft on!
Anita
Subscribe to:
Posts (Atom)