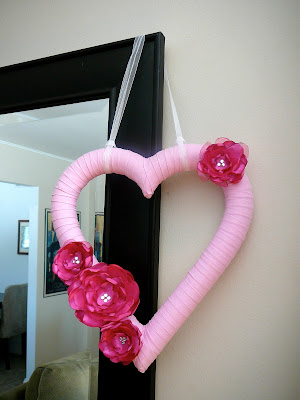
Tiz the season for hearts and cupids and such, but I just realized we don't have one single Valentine decoration in our whole house. I had to remedy that. Enter the Valentine Heart Wreath.
Stuff you need:
Flower template - print this using landscape paper orientation so it fills up the whole page
Styrofoam heart wreath form (mine was 14" X 12")
1/2" White ribbon - 8 feet
Fabric - light pink cotton - 1/2 yard
hot pink polyester satin - 1/4 yard
hot pink polyester organza - 1/8 yard
Rhinestones - 13
Candle w/ candlestick
Glue gun w/ glue
Tweezers
Scissors
Marker
1. First things first. If you don't have any already made, assemble your pink bias tape. You will need 25 feet. (Need a how-to for bias tape? Click here.)
2. Take a scrap piece of your light pink fabric and wrap the two points of your heart. There's no wrong way to do this step. You just want to make sure the point is completely covered front and back. This is a background to hide the space you won't be able to cover with the bias tape wrapping.
3. Take your wreath form and mark where your large flower will be located. This is where you will start wrapping your wreath with the pink bias tape. Glue down one of the ends and start to wrap your heart like a little pink mummy, overlapping each layer so there's no gaps. You will want to periodically glue your bias tape to the form just to keep it pretty. Here's what my two points looked like when I was done wrapping them.
And your heart will now look like this.
5. Now for the flowers you will need to cut out the following numbers of each shape.
- A - 2 (satin)
- B - 5 (organza)
- C - 8 (satin)
- D - 8 (organza)
- E - 8 (satin)
6. Follow the video below to prep your layers for assembly.
7. Now that you have all your individual layers melted with the candle we are going to assemble them. This is the order for each of the flowers.
- Large flower
- A, A, B, B, C, C, D, D, E, E
- Small flowers
- B, C, C, D, D, E, E
TIP* - When you are stacking layers offset them so that the petals show through like below.
TIP* - Hot glue your satin layers together first and layer the organza with them. Otherwise the glue will just ooze through and burn your fingers.
8. Now that your flowers are assembled you need to add a couple rhinestones to each for the centers. I put 4 in the large flower and 3 in each of the small ones. This is where your tweezers come in to drop your rhinestones in the glue. No burnt fingers please.
9. Glue your large flower onto the heart first. Add two little ones on either side and the third on the opposite corner of your wreath. Almost done!
10. All that's left to do is add your ribbon for hanging your beautiful wreath. You can just tack it onto the back if you want a more simple approach, but I wanted mine to be a little more intricate.
11. DONE!
Hope you all have a great Valentines Day with plenty of chocolate.
Craft on!
Anita


I looked for stiraphome heart wreaths everywhere and they were all out, so I couldn't make one :( I did however find a cardboard heart to cover that will be cute if I ever finish ;-) Stop by sometime!
ReplyDeletemiamoodesigns.blogspot.com
Sorry for the lack of supplies in your neck of the woods. I would love to see how the cardboard one turns out though. Drop me a pic if you end up making it!
ReplyDeletelook at you gettin all fancy with the videos and stuff! you need a tv show!
ReplyDeleteYour doggie is so sweet and patient! Love the flowery heart too...thanks for the tutorial and for linking up to Fridays Unfolded!
ReplyDeleteBlessings,
Alison
Stuff and Nonsense
Gorgeous!
ReplyDeleteHere from Sugar and Dots!
Very pretty, love the soft pink!
ReplyDeleteSo pretty, love the flowers! :)
ReplyDeleteCute! I like in on the dog too! Good call on the bias tape!
ReplyDeleteThanks for linking up to Making It With Allie! I can't wait to see what you have for next week!
AllieMakes.Blogspot.com
LOVE that picture of your sweet doggie!! SO much so that we featured your link up today!!! Go check it out here and grab a featured button! Thanks for linking to Fancy This Fridays! http://trulylovelywiththelaneysisters.blogspot.com/2011/02/fancy-this-features-edition-11-day-late.html
ReplyDeleteI love the flowers! It's so pretty how you've made them with the petals, they look much more fancy that way. :)
ReplyDelete