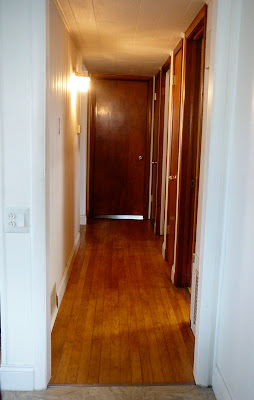
So we have this hallway. Its a long hallway for the size of our house and I could not find a runner that would go the length of it that was under $300 and I wouldn't even entertain the idea of getting one custom made. Everything was either too short, by about 5 feet, or way too expensive. Of course that means I needed to kick into creative mode. I made this custom runner in 3 hours and for only $56. That's cheaper than most of the rugs I found that were only 7 feet long. This runner is over 12 feet long and just shy of 2.5 feet wide.
Supplies:
Carpet tiles - 2 colors, one for the border and one for the center strip, mine are berber for high traffic. You can easily find these at most big box hardware stores. Mine were on sale for only $2.13 a square.
* Do step one before going to the store to buy them. That's where you calculate how many you'll need.
Duct tape - get the heavy duty stuff for extra stickiness
Metal ruler
Measuring tape
Box cutter with new blade
Sharpie
*Optional* Non-slip rug pad - We added this because our rug is in a high traffic area. I did walk on the finished rug without it and think you can get by without if you don't want to do the added step. See step 1 for the size you need to buy.
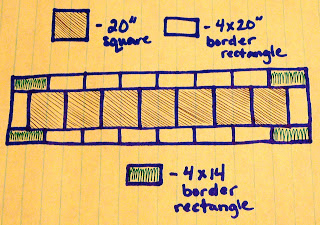
- I used standard carpet tiles that are 50 cm (about 20 inches for our purpose) squares.
- I've chosen a 4 inch border for this tute cuz I like the visual proportions.
- This tute also uses a standard width of 28 inches, with the 4" border. It covers enough of my hallway without covering all of the pretty wood flooring. You can customize this in the next step.
- I highly recommend buying a couple extra tiles of each color in case you make a cutting mistake. Its also nice to have extras on hand just in case one of the tiles gets dirty or stained so you can replace it.
Here's where we figure out how many tiles you'll need to pick up.
- Pick the length of runner you want from this chart and buy your tiles. NO MATH! or
- Follow this link if you want to adjust your runner to a more specific length or change the border width. WARNING! There is some basic math/spreadsheet stuff involved here! You need to have Excel or Numbers to use this spreadsheet.
- *Optional rug pad - Now that you know how big your runner will be you need to get a rug pad that is slightly smaller than the runner's finished size. Mine is about a half inch shorter than the runner on all four sides. More on this in step 6.
I used three good size pieces of duct tape on each side. You want to make sure you secure the seams pretty good so add more if you want. I taped these guys together upside down so you'll have to flip them over before adding the border.
*Pay attention to the pattern, if there is one, of your carpet squares. If you want to double check that you're joining them together on the right grain check the back. The arrows on the back indicate the direction of the pattern. You can also intentionally vary the pattern orientation for a more funky look.
If you're rug is really long you will want to tape these together right side up instead(see step 5 for pictures of that method) since a large rug will pull apart when you try to flip it.
# of squares used in center strip * 2
Make sure you're cutting your tiles on a surface that its OK to gouge, like our junky deck off the back door. First I drew a line where I was going to cut so I could see if I went off track.
Then I put pressure on my metal ruler and used it as a guide to cut through the back of the carpet tile with my box cutter. It's best to do this in a couple of cuts, gradually working your way through in layers. It also lessens the chance you'll cut yourself.
Starting on one end you will tape your border pieces in this order. Notice that I offset all the seams of the border tiles. This makes the rug much less likely to tear apart and helps hide the seams, if thats the look you're going for.
This is my technique.
Make sure you tape each of the joints. Place your tape on the back of the tiles already assembled first.
Don't tape your rug to the floor so double check your tape hasn't stuck to anything other than the tiles.
I put the pieces on and angle and butted them up against each other before laying them down flat. This helped to keep me from having gaps between pieces.
Now just keep movin down the line. My hubby had a great idea and snipped off a bunch of pieces of duct tape and lightly stuck them to the wall so I could grab them as I went along.
If you get to the end of your rug and one or both of your shorter border pieces are a little long just take them back to your cutting area and trim them to fit.
*Optional This step is only if you have decided to add a non-slip pad under your rug. Measure your finished rug's dimensions and trim your pad to about 1/2 inch shorter on all four sides. That means if your rug is 28 x 146 then your pad should be about 27 x 145.
They don't really sell rug pads in that length so I just bought two that I could cut to the right size. They're really cheap anyway.
You may need help getting your pad under the rug at this point depending on how big it is. Have your helper hold the runner from one end, with their hands holding any joints at that edge together, and lift slowly so as to not pull your rug apart.
 |
| BEFORE |
 |
| AFTER |
 |
Here's a close-up of the corners and how you can tell the difference in pattern direction.
I think there are alot of dog naps already scheduled for our new floor addition.
Craft on!
Anita


Perfect!
ReplyDeleteJo @ SmileMonsters
looks great, and your dog is precious! :) loved the step-by-step tutorial
ReplyDeleteGRREAT JOB! I am now following, because I never met a dog I didn't like, and yours are adorable!Love that header! Stop by and visit to see my fur babies!
ReplyDeleteWhat a great idea!!! We have a very long hallway in our house in desperate need of a runner like this!!!
ReplyDeleteI'm following you from the Miss Crafty Pants Blog Party... please follow me:
www.daughterbydesign.blogspot.com
Such a great idea! Your dog is very good at posing for pictures! :)
ReplyDeleteYou did a really great job! Thank you for linking to Masterpiece Monday. Have a great week, Mary :O)
ReplyDeleteGreat idea and I love how your dog posed for the pic. Please be sure to post my party button or my blog name with a link back to me...thank you:)
ReplyDeleteBlessings,
Linda
Great idea and wonderful tutorial! Looks like a great place for dog naps.
ReplyDeleteThat's such a good idea and it looks great! The colours coordinate so well with your dog too... love it!
ReplyDeleteThat is genius! Thanks for sharing over at Tuesday Tell All.
ReplyDeleteMelissa
MyCraftieLife.Blogspot.com
This looks great! I can't believe you made it!
ReplyDeletethat is a great idea, it turned out perfect! thanks for sharing this at my party!
ReplyDeleteOh my word, that is amazing. I would have never thought of that! Now I wish I had a long hallway so I could make one myself! =)
ReplyDeleteThat looks fabulous and I have to admit I didn't even know they made carpet tiles, lol. Great stuff.
ReplyDeleteOh superb idea! This looks really great!
ReplyDeleteAmber @ barbwired
Looks great! I didn't realize it was as easy as you made it look!
ReplyDeletehow creative are you?! i love this idea! thanks for sharing!!
ReplyDeleteJust genius! If you can't find what you need, just make it! Great job! Thanks for linking up! Sharing this on my Facebook page too!
ReplyDeleteIt turned out great! And what a sweet dog!!
ReplyDeleteBeautifully done! Oh, how I wish carpet tiles had been around a few years ago when we lived in a little bungalow with a very long hallway and a Weagle (half Whippet, half beagle) with an inconsistent bladder. We searched everywhere for a runner that was long enough, to no avail.
ReplyDeleteThank you so much for linking up another fabulous project at Rook No. 17!
Jenn
It looks pretty indestructible too! Perfect for a house with doggies!! Thanks for sharing on Fancy This Fridays!
ReplyDeleteYOur dog is adorable. Thanks for being a part of Seasonal Sundays.
ReplyDelete- The Tablescaper
Very nice! I'm a new follower. I love the puppy! Stop by when you get a chance!
ReplyDeleteWhat a great idea!
ReplyDeleteYou guys are so well organized! I love that your husband had the idea to place the strips along the wall to make things easier for you. And what a cutie pie puppy you have. Great work! I'd love for you to add this to the Hump Day Hoorah link party. I hope to see you there! :)
ReplyDeleteThat is so great! You cannot beat that, I have been looking for a rug, but I might just have to make one instead! I have chosen to feature you tomorrow at Fantastic Friday. Stop by and grab a button and link up some more of your great ideas!!
ReplyDeleteThanks so much for linking this with my Show and Share party! I featured this project, please come check it out and grab a bragging rights button.
ReplyDeleteThis is such a great ideal!! Thanks so much for sharing at Make Something Mondays! Can't wait to see what you have this week!!
ReplyDelete~ Sarah
Carpet tiles can be fitted on any type of flooring and there is no need to change or remove older concrete or wooden flooring to fit them. This is perfect for people who are only renting a property like me as I can simply remove the tiles and take them with me when I move.
ReplyDeleteThese all picture looks perfect in this post. I think a rug really pulls a room together, they are expensive but its quality is really excellent, so i will purchase this for my home.
ReplyDeletesite